Best AI Image Generators (July 2023)

The landscape of many businesses is altering due to artificial intelligence, and picture creation is one area where this is happening significantly. Numerous AI picture generators use artificial intelligence algorithms to turn text into graphics. These AI tools may be a terrific method to visualize your thoughts or notions swiftly in a couple of seconds.

So, Which AI image generator is worth trying? Here are some cool AI image generators available in 2023:

Shutterstock AI Image Generator 

Shutterstock AI Image Generator is a game-changer in the world of design. By harnessing the power of AI, users can create truly breathtaking and unique designs with ease. This incredible new feature was made possible through a partnership with OpenAI, which provided the tool with DALL-E 2 technology. What sets this software apart from others is that it was trained with Shutterstock images and data, making the end result a fully licensable image. This breakthrough has huge implications for the art world, as it allows people to use AI-generated art without infringing on the intellectual property rights of others. With ethical artworks ready for download in just seconds, there’s never been a better time to get creative. With Shutterstock’s Free Trial Offer, you can get up to 10 AI-Generated Images for free!

FotorAI Image Generator

The FotorAI Image Generator is a tool that the company offers that creates fresh photographs using Artificial Intelligence (AI) technology. Users can enter a sample image, and it will use that sample to create a brand-new, original image. The new photos claimed to be extremely realistic and of the highest quality, are produced by the feature using a Generative Adversarial Network (GAN). It can be used for many things, including making fresh images for graphic design and digital art. Fotor’s premium version is the only place it can be found.

Nightcafe

Nightcafe is the best AI text-to-image generator, converting keywords into creative and realistic pictures. Using only the most basic English words, you may produce customized graphics that exactly capture your desire. Nightcafe also provides several creatives and styles that can be utilized to create various digital artwork. For example, you can employ neural style transfer to transform commonplace images into artistic creations. Nightcafe’s user-friendly software makes it essentially accessible to beginners. Thanks to the user-friendly and appealing website design, anyone may create and improve images with only one click. You need not consider saving any creation you produce elsewhere because it is forever preserved in your account.

Dream By Wombo

In contrast to other AI picture generators, Dream By Wombo allows for continuous image production without restrictions on its capabilities or cost. This AI generator is a great alternative for individuals who are on a small budget or who are still learning. Additionally, Dream By Wombo is simple to utilize. You must sign up, write a text, and select the style of the image. Once your vision has been generated, you can keep it or start over by choosing a different sort.

DALL-E 2

In 2021, OpenAI published DALL-E 2. A follow-up to OpenAI’s DALL-E image-generating AI model, DALL-E 2, was created. Similar to its predecessor, DALL-E 2 is made to produce high-quality graphics from text prompts. DALL-E 2, on the other hand, has several advantages over the first model, such as a greater capacity that enables it to produce images at a better quality and with more detail. DALL-E 2 can have a wider range of graphics and comprehend and react to more intricate text cues. Additionally, it can be tailored to certain activities or domains, such as creating photographs of particular objects or scenes.

Midjourney

With its extensive features and lightning-fast image synthesis, Midjourney is also one of the greatest AI image generators. Give Midjourney a text prompt, and it will handle the rest. To create the visuals they need as inspiration for their work, many artists employ Midjourney. In a competition for fine art at the Colorado State Fair, the artificial intelligence artwork “Théâtre d’Opéra Spatial,” created with Midjourney, won first place, besting 20 other painters. Midjourney is currently housed on a Discord server, though. You must join MidJourney’s Discord server and use the commands in the bot to generate photos. But that’s simple; you can get going right away.

Dream Studio (Stable Diffusion)

One of the most well-liked text-to-image AI generators is Dream Studio, also known as Stable Diffusion. It is an open-source model that quickly transforms text suggestions into graphics. Dream Studio may produce every picture, including photographs, illustrations, 3D models, and logos. Photorealistic artwork can be created by combining an uploaded photo with a written description.

Craiyon

Craiyon is an intriguing AI picture generator with a website and an app that can be downloaded from the Google Play Store for Android devices. This free service, formerly known as DALL-E Mini, functions similarly to its paid counterpart. From comprehensive written descriptions, you can create photos of reasonably high quality. However, Craiyon is prone to server overload, leading to long creation wait times and regrettable design errors. You may use the photographs for personal and professional purposes, but you must give credit to Craiyon and abide by the usage guidelines outlined in their Terms of Use.

Deep Dream Generator

Deep Dream Generator is recognized for its superb and realistic pictures. Deep Dream Generator is the best option if you’re looking for an AI picture generator that creates visuals based on real-world occurrences. This AI picture generator focuses on making the photos seem from another time or place. It was created by Google researchers to make picture creation easy and accessible to everyone. As a result, even if you lack experience, you may quickly create an image from your words.

Starry AI

Starry AI is one of the leading online providers of text-to-picture AI pictures. You may create photographs with more personalization using its granular tool than with other AI image producers. Starry AI has divided the production of digital art into two stages to make things as easy as possible for its clients. You must choose between Orion and Altair before you can generate a picture. Orion produces visuals that portray fiction, whereas Altair produces images that show abstraction. The following step is picking a background and style for the images you take.

Artbreeder

The original AI image generator Artbreeder combines many images into a single image. Using Artbreeder, you can recreate the pictures in your collection as accurate, entirely new photographs. If you have a secure location to store them, you can receive thousands of unique and eye-catching art drawings on your Artbreeder account. In addition, ArtBreed’s user interface is remarkably simple, making it easy for inexperienced and seasoned graphic artists to use.

Photosonic by Writesonic

A potent AI writing tool called Writesonic also provides a free AI art generator called Photosonic. Using this AI picture generator, you may quickly create digital art from your thoughts. To make an AI image, you can either enter a prompt or use an existing image to generate something new. The latent diffusion model is used by Photosonic, which transforms a random image into a coherent image based on the provided description. Additionally, it supports a variety of art styles, making it simple to locate the one that is ideal for your job.

DeepAI

An AI Text-to-Image generator like this one. Using a word description as a starting point, its AI model can produce original visuals based on stable Diffusion. You can make a limitless amount of original photographs using DeepAI, free to use. Additionally, a developer can connect it to another software project using the free text-to-picture API. However, compared to the other AI picture generators featured on this page, the quality could be more lifelike.

Jasper Art

Jasper Art is a brand-new feature introduced by the AI copywriting tool Jasper. Text is decoded using artificial intelligence, and an image is provided in response. Text can be converted into images using Jasper art. Use Jasper if you’re a business owner, blogger, or content creator looking for a low-cost, user-friendly text-to-picture AI image generator that produces stunning, unique images. So if you need amazing, high-quality photographs for your blog or website, Jasper is a site to check out.

Pixray

Pixray is a versatile text-to-image converter available as an API, browser website, and PC application. Although Pixray has an attractive and straightforward user interface, tech-savvy people will adore its enigmatic changes and distinctive AI engine. When you explore the choices for post-image creation, Pixray really shines. It’s a wonderful tool for shooting images. You can edit your photo aesthetically, convert it to a movie, change the style, and use other tools under the settings section.

BigSleep

One of the most popular and well-known AI picture generators available today is called BigSleep. The explanation is that BigSleep’s powerful software creates real things from nothing. BigSleep produces photos of the highest caliber, but its platform is really simple to use and offers all the tools you need to put your photos together, edit them, and store them securely. Additionally, BigSleep contains a Python-based application that guarantees the speed and smooth operation of the software.

RunwayML

RunwayML offers a video editing feature for altering the background of your photographs when making films. RunwayML creates high-quality images from text input using machine learning models. There are many different image styles available. However, the main focus is employing AI to make animations and edit films. For instance, the program can eliminate the background in videos that don’t utilize green screen technology.

Also, don’t forget to join our Reddit Page, Discord Channel, and Email Newsletter, where we share the latest AI research news, cool AI projects, and more.

If you have any questions, feel free to message us at Asif@marktechpost.com
The post Best AI Image Generators (July 2023) appeared first on MarkTechPost.

Meet ChatHN: A Real-Time AI-Powered Chat On Hacker News Feed

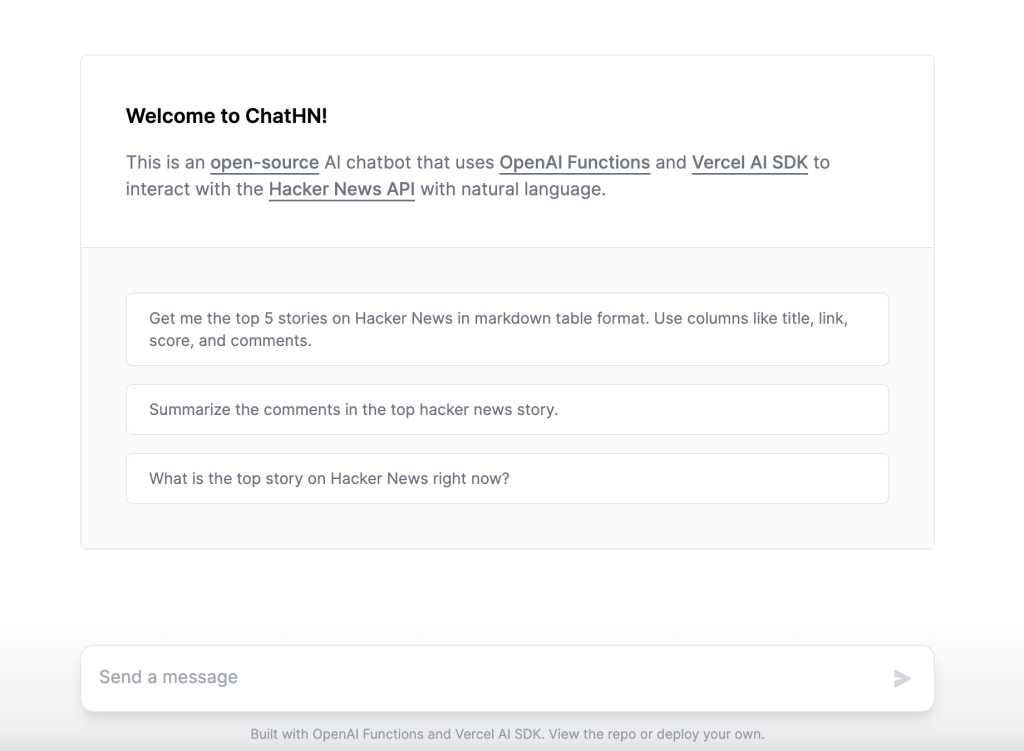
ChatHN, driven by AI, has recently been launched in the Hacker News Feed. ChatHN is a free and open-source artificial intelligence (AI) chatbot built with OpenAI Functions and the Vercel AI SDK for conversational interactions with the Hacker News API. Using the instructions at https://github.com/steven-tey/chathn, anyone may deploy their instance of ChatHN with a single click. 

ChatHN is a platform that facilitates conversational interactions with Hacker News (HN). Features include retrieving the most popular articles, a specific article, or an article along with comments from Hacker News. ChatHN can also be used to summarize the most popular story and comments on Hacker News. ChatHN aims to facilitate conversational access to Hacker News material without requiring direct usage of the Hacker News website or API.

Completely free to use and modify, it was developed using the following:

OpenAI’s new Functions Calling feature

Vercel AI SDK

HackerNews API

Check out here: chathn.vercel.app

OpenAI’s Functions

Models developed by OpenAI called GPT (generative pre-trained transformer) can interpret both human language and computer code. In reaction to the inputs given to them, GPTs generate texts. The inputs to GPTs are often known as “prompts” for short. To “program” a GPT model, one must first design a prompt, which usually consists of instructions and examples of the desired behavior. A chat model’s input is a collection of messages; its output is a new message. The chat style was created to facilitate lengthy discussions but may also be used effectively for shorter interactions.

Knowing how to optimize your work with GPTs can significantly impact how quickly and efficiently your applications run. It’s sometimes obvious how to work around or fix the many failure modes that GPTs display. Working with GPTs requires a set of skills dubbed “prompt engineering,” but as the subject has advanced, its focus has broadened to include engineering systems that use model inquiries as building blocks. 

Vercel AI SDK

The Vercel AI SDK is a free library for creating conversational streaming UIs in JavaScript and TypeScript. The SDK is compatible with Node.js, Serverless, Edge Runtime, React/Next.js, Svelte/SvelteKit, and Vue/Nuxt.

Features That Make ChatHN Great

Some of ChatHN’s most notable characteristics are:

ChatHN is a tool for reading the most popular stories on Hacker News. Based on the number of votes and comments, it pulls up the most recent and discussed articles. The number of tales one wishes to obtain can also be specified.

Using ChatHN and the story’s ID, a user can retrieve a specific article from Hacker News. This provides information about the story, including its title, author, rating, and URL.

Annotated Narrative: It is possible to acquire a single story from Hacker News together with all of the comments that have been made on it. This function helps peruse the feedback and thoughts of the Hacker News community on a specific story.

The most popular article on Hacker News, along with the comments, can be summarized as ChatHN. This feature outlines the most discussed article on Hacker News in a concise format.

Check Out Project Page, Tweet 1, and Tweet 2. Don’t forget to join our 25k+ ML SubReddit, Discord Channel, and Email Newsletter, where we share the latest AI research news, cool AI projects, and more. If you have any questions regarding the above article or if we missed anything, feel free to email us at Asif@marktechpost.com

Featured Tools:

StoryBird AI

Taplio

tinyEinstein

AdCreative.ai

SaneBox

Katch

Check Out 100’s AI Tools in AI Tools Club
The post Meet ChatHN: A Real-Time AI-Powered Chat On Hacker News Feed appeared first on MarkTechPost.

Meet The New Zeroscope v2 Model: A Free Text-To-Video Model That Runs …

In an unprecedented series of events, a next-generation open-source AI model called Zeroscope has been put out in the market with the ability to run state-of-the-art text-to-video service on modern-day graphics cards available to users at comparatively much cheaper costs. China’s Modelscope-owned Zeroscope aims to revolutionize media and video creation by unlocking a new spectrum of AI use cases.

It is important to understand the functional components of Zeroscope to understand how it is revolutionizing the field of video generation via text. What makes this open-sourced model stand out is its two key components, Zeroscope V2 and Zeroscope V2XL; Zeroscope_v2 567w, designed for rapid content creation in a resolution of 576×320 pixels to explore video concepts. Quality videos can then be upscaled to a “high definition” resolution of 1024×576 using zeroscope_v2_XL, So a user can rapidly create videos using ZeroScope V2 and then upscale them with V2XL. 

In addition to that, Zeroscope’s requirements are surprisingly manageable due to the multi-level model’s 1.7 billion parameters. Zeroscope operates with the VRAM requirements of 7.9 Gigabytes at the lower resolution and 15.3 Gigabytes at the higher. The smaller model is built to be executable on many standard graphic cards, which makes it accessible to a wider and more general user base. 

Zeroscope has been strategically trained with offset noise on almost 10,000 clips and nearly 30,000 tallied frames, each comprising frames. This unconventional set of actions unlocks new opportunities and possibilities for Zeroscope. With the introduction of variations such as random shifts of objects, slight changes in frame timings, and minor distortions, the model improves its understanding of the data distribution, which helps the model to generate more realistic at diverse scales and effectively interpret the nuanced variations in text descriptions. With all these features, Zerscope is quickly on the way to becoming a worthy contender of Runway, which is a commercial text-to-video model provider. 

Text to video is as a field is a work in progress, as video clips that are generated tend to be shorter and laden with some visual shortcomings. However, if we look at the track record of Image AI models, they, too, suffered from similar challenges before they achieved a state to attain photo-realistic quality. The main challenge is that video generation demands significantly more resources at both the training and generation phases. 

Zeroscope’s emergence as a powerful text-to-video model paves the way for many new digital advancements and use cases, such as: 

Personalized Gaming, VR, and Metaverse: Zeroscope’s transformation capability can redefine storytelling in video games. Players can influence cut scenes and gameplay in real-time through their words, enabling unimaginable interaction and personalization. Additionally, game developers can rapidly prototype and visualize game scenes, accelerating development.

Personalized Movies: Zeroscope’s technology disrupts the media industry by generating individualized content based on user descriptions. Users can input storyline or scene descriptions and have personalized videos created in response. This feature allows for active viewer participation and opens avenues for custom content creation, such as personalized video advertisements or user-tailored movie scenes.

Synthetic Creators: Zeroscope paves the way for a new generation of creators who rely on AI to write, produce, and edit their ideas into reality. It removes technical skill set barriers in video creation and has the potential to establish a new standard for automated, high-quality video content. The line between human and AI creators blurs, expanding the landscape of creativity.

Zeroscope is as intended, a lightweight breakthrough model that can be easily fine-tuned and does not require special resources setup, which makes it not only a tool that multiple general audiences can use but many new emerging researchers that lack the resources of a big lab, can now work with such algorithms to understand them better and to evolve this whole field in a better way at reasonable costing. Seeing how tough competition will inspire Zeroscope creators to innovate and grab a strong market position would be amazing. 

Check Out The 567w and Zeroscope v2 XL on Hugging Face. Based on this reference article. Don’t forget to join our 25k+ ML SubReddit, Discord Channel, and Email Newsletter, where we share the latest AI research news, cool AI projects, and more. If you have any questions regarding the above article or if we missed anything, feel free to email us at Asif@marktechpost.com

Featured Tools:

StoryBird AI

Taplio

tinyEinstein

AdCreative.ai

SaneBox

Katch

Check Out 100’s AI Tools in AI Tools Club
The post Meet The New Zeroscope v2 Model: A Free Text-To-Video Model That Runs On Modern Graphics Cards appeared first on MarkTechPost.
Recommend and dynamically filter items based on user context in Amazon …

Organizations are continuously investing time and effort in developing intelligent recommendation solutions to serve customized and relevant content to their users. The goals can be many: transform the user experience, generate meaningful interaction, and drive content consumption. Some of these solutions use common machine learning (ML) models built on historical interaction patterns, user demographic attributes, product similarities, and group behavior. Besides these attributes, context (such as weather, location, and so on) at the time of interaction can influence users’ decisions while navigating content.
In this post, we show how to use the user’s current device type as context to enhance the effectiveness of your Amazon Personalize-based recommendations. In addition, we show how to use such context to dynamically filter recommendations. Although this post shows how Amazon Personalize can be used for a video on demand (VOD) use case, it’s worth noting that Amazon Personalize can be used across multiple industries.
What is Amazon Personalize?
Amazon Personalize enables developers to build applications powered by the same type of ML technology used by Amazon.com for real-time personalized recommendations. Amazon Personalize is capable of delivering a wide array of personalization experiences, including specific product recommendations, personalized product reranking, and customized direct marketing. Additionally, as a fully managed AI service, Amazon Personalize accelerates customer digital transformations with ML, making it easier to integrate personalized recommendations into existing websites, applications, email marketing systems, and more.
Why is context important?
Using a user’s contextual metadata such as location, time of day, device type, and weather provides personalized experiences for existing users and helps improve the cold-start phase for new or unidentified users. The cold-start phase refers to the period when your recommendation engine provides non-personalized recommendations due to the lack of historical information regarding that user. In situations where there are other requirements to filter and promote items (say in news and weather), adding a user’s current context (season or time of day) helps improve accuracy by including and excluding recommendations.
Let’s take the example of a VOD platform recommending shows, documentaries, and movies to the user. Based on behavior analysis, we know VOD users tend to consume shorter-length content like sitcoms on mobile devices and longer-form content like movies on their TV or desktop.
Solution overview
Expanding on the example of considering a user’s device type, we show how to provide this information as context so that Amazon Personalize can automatically learn the influence of a user’s device on their preferred types of content.
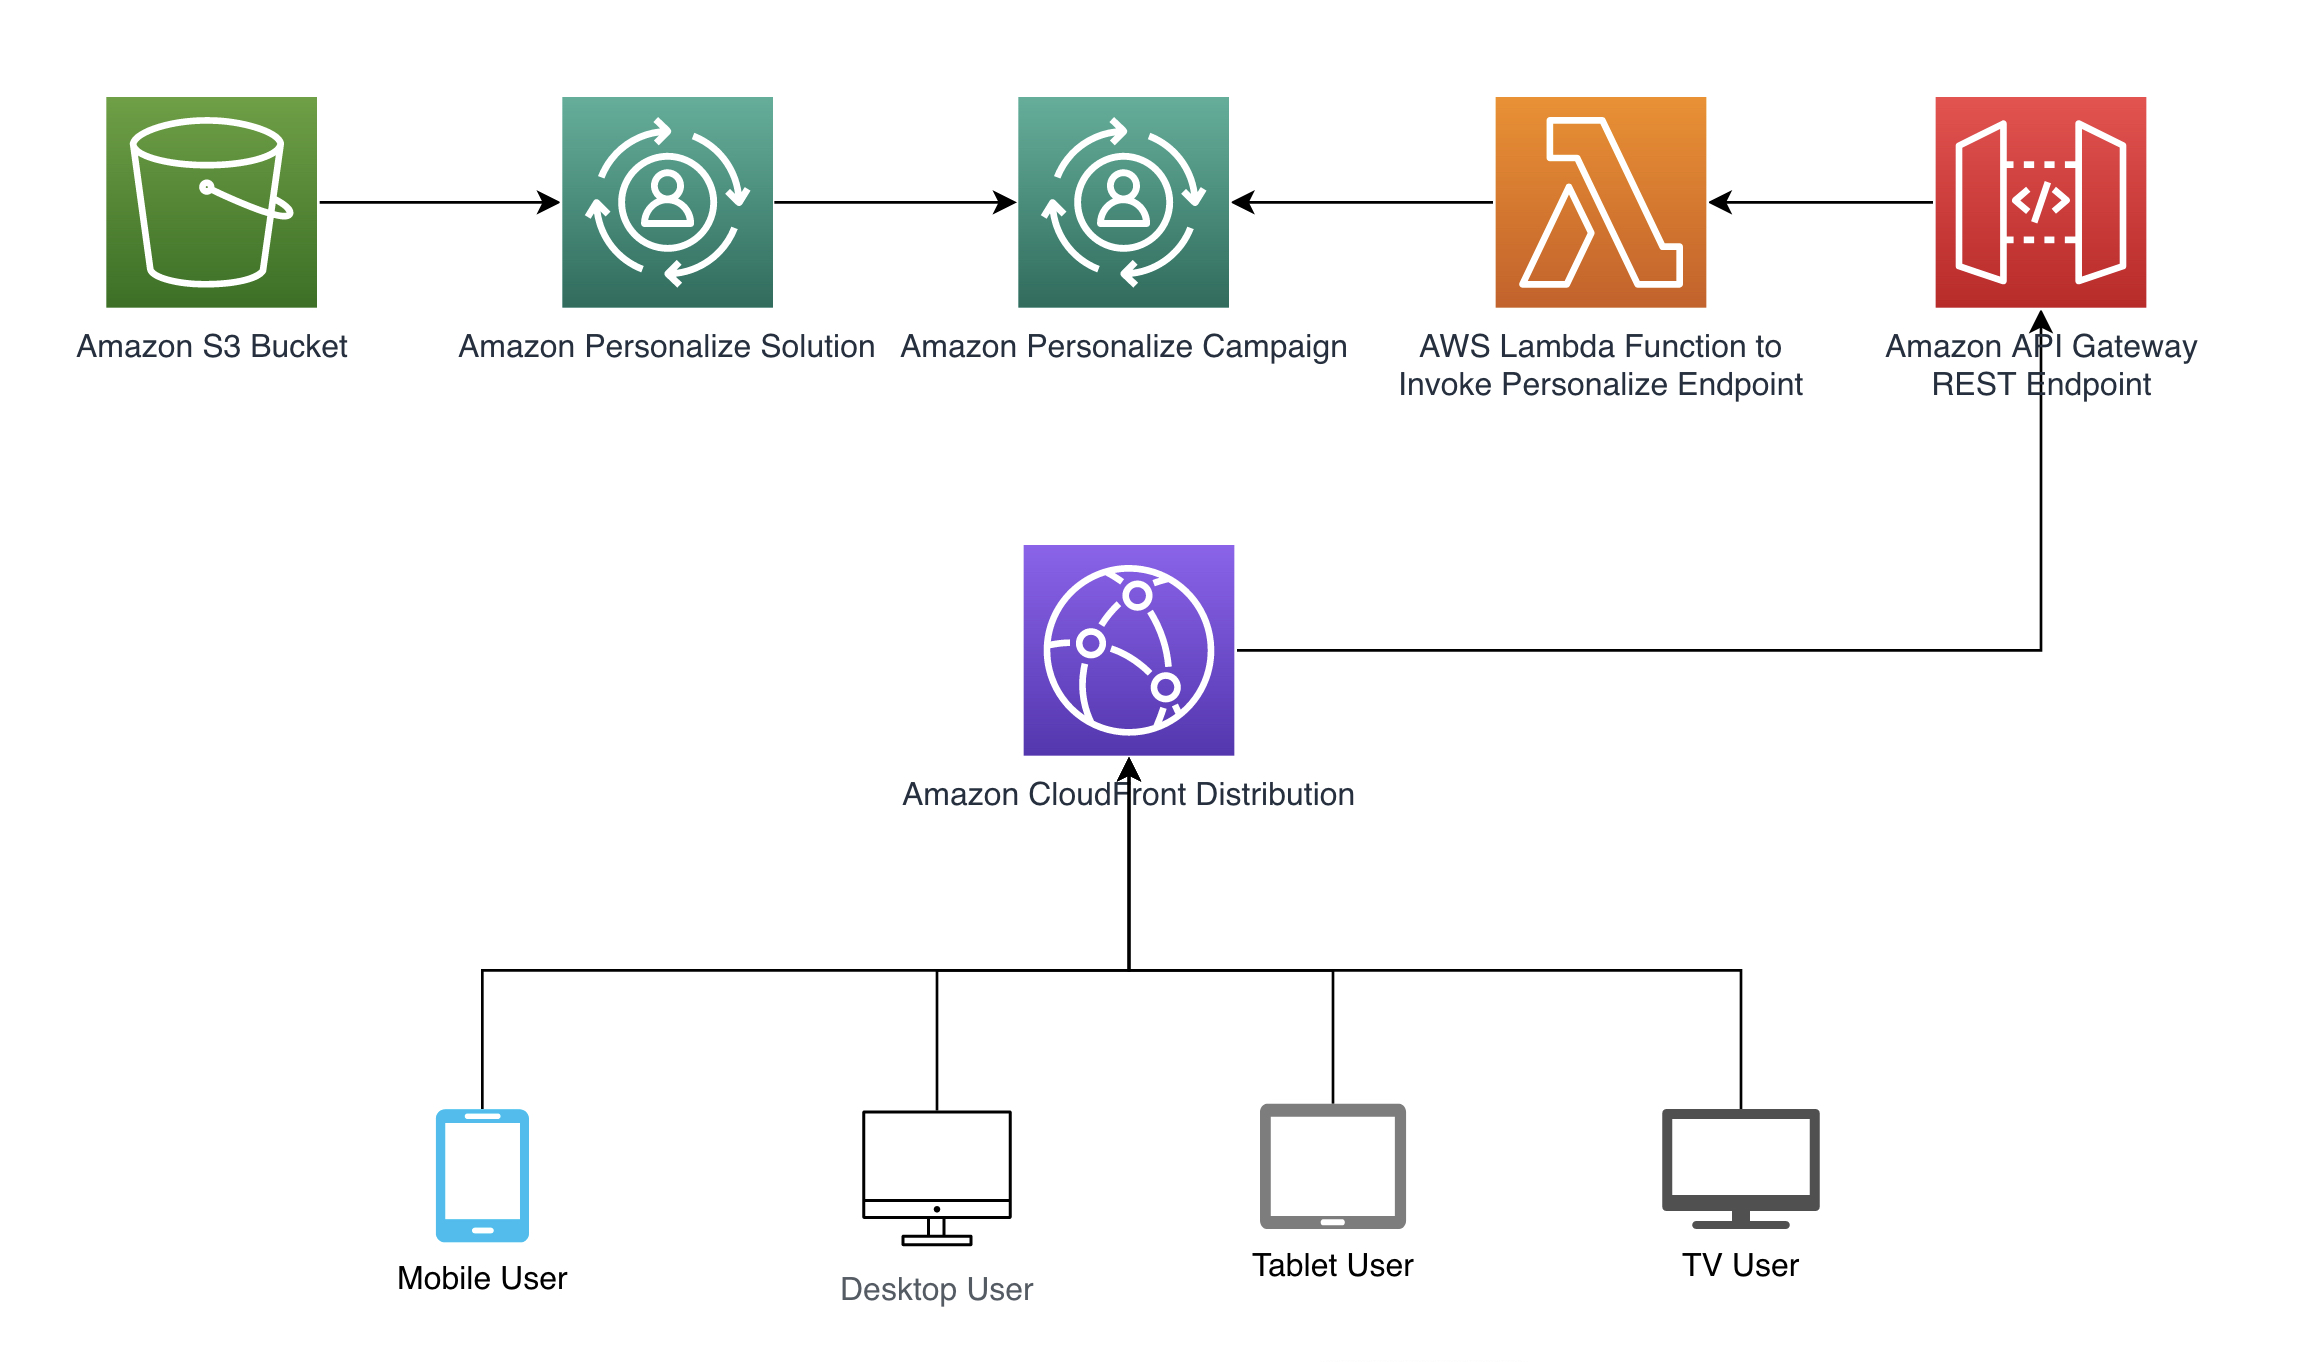
We follow the architecture pattern shown in the following diagram to illustrate how context can automatically be passed to Amazon Personalize. Automatically deriving context is achieved through Amazon CloudFront headers that are included in requests such as a REST API in Amazon API Gateway that calls an AWS Lambda function to retrieve recommendations. Refer to the full code example available at our GitHub repository. We provide a AWS CloudFormation template to create the necessary resources.

In following sections, we walk through how to set up each step of the sample architecture pattern.
Choose a recipe
Recipes are Amazon Personalize algorithms that are prepared for specific use cases. Amazon Personalize provides recipes based on common use cases for training models. For our use case, we build a simple Amazon Personalize custom recommender using the User-Personalization recipe. It predicts the items that a user will interact with based on the interactions dataset. Additionally, this recipe also uses items and users datasets to influence recommendations, if provided. To learn more about how this recipe works, refer to User-Personalization recipe.
Create and import a dataset
Taking advantage of context requires specifying context values with interactions so recommenders can use context as features when training models. We also have to provide the user’s current context at inference time. The interactions schema (see the following code) defines the structure of historical and real-time users-to-items interaction data. The USER_ID, ITEM_ID, and TIMESTAMP fields are required by Amazon Personalize for this dataset. DEVICE_TYPE is a custom categorical field that we are adding for this example to capture the user’s current context and include it in model training. Amazon Personalize uses this interactions dataset to train models and create recommendation campaigns.

{
“type”: “record”,
“name”: “Interactions”,
“namespace”: “com.amazonaws.personalize.schema”,
“fields”: [
{
“name”: “USER_ID”,
“type”: “string”
},
{
“name”: “ITEM_ID”,
“type”: “string”
},
{
“name”: “DEVICE_TYPE”,
“type”: “string”,
“categorical”: True
},
{
“name”: “TIMESTAMP”,
“type”: “long”
}
],
“version”: “1.0”
}

Similarly, the items schema (see the following code) defines the structure of product and video catalog data. The ITEM_ID is required by Amazon Personalize for this dataset. CREATION_TIMESTAMP is a reserved column name but it is not required. GENRE and ALLOWED_COUNTRIES are custom fields that we are adding for this example to capture the video’s genre and countries where the videos are allowed to be played. Amazon Personalize uses this items dataset to train models and create recommendation campaigns.

{
“type”: “record”,
“name”: “Items”,
“namespace”: “com.amazonaws.personalize.schema”,
“fields”: [
{
“name”: “ITEM_ID”,
“type”: “string”
},
{
“name”: “GENRE”,
“type”: “string”,
“categorical”: True
},
{
“name”: “ALLOWED_COUNTRIES”,
“type”: “string”,
“categorical”: True
},
{
“name”: “CREATION_TIMESTAMP”,
“type”: “long”
}
],
“version”: “1.0”
}

In our context, historical data refers to end-user interaction history with videos and items on the VOD platform. This data is usually gathered and stored in application’s database.
For demo purposes, we use Python’s Faker library to generate some test data mocking the interactions dataset with different items, users, and device types over a 3-month period. After the schema and input interactions file location are defined, the next steps are to create a dataset group, include the interactions dataset within the dataset group, and finally import the training data into the dataset, as illustrated in the following code snippets:

create_dataset_group_response = personalize.create_dataset_group(
name = “personalize-auto-context-demo-dataset-group”
)

create_interactions_dataset_response = personalize.create_dataset(
name = “personalize-auto-context-demo-interactions-dataset”,
datasetType = ‘INTERACTIONS’,
datasetGroupArn = interactions_dataset_group_arn,
schemaArn = interactions_schema_arn
)

create_interactions_dataset_import_job_response = personalize.create_dataset_import_job(
jobName = “personalize-auto-context-demo-dataset-import”,
datasetArn = interactions_dataset_arn,
dataSource = {
“dataLocation”: “s3://{}/{}”.format(bucket, interactions_filename)
},
roleArn = role_arn
)

create_items_dataset_response = personalize.create_dataset(
name = “personalize-auto-context-demo-items-dataset”,
datasetType = ‘ITEMS’,
datasetGroupArn = items_dataset_group_arn,
schemaArn = items_schema_arn
)

create_items_dataset_import_job_response = personalize.create_dataset_import_job(
jobName = “personalize-auto-context-demo-items-dataset-import”,
datasetArn = items_dataset_arn,
dataSource = {
“dataLocation”: “s3://{}/{}”.format(bucket, items_filename)
},
roleArn = role_arn
)

Gather historical data and train the model
In this step, we define the chosen recipe and create a solution and solution version referring to the previously defined dataset group. When you create a custom solution, you specify a recipe and configure training parameters. When you create a solution version for the solution, Amazon Personalize trains the model backing the solution version based on the recipe and training configuration. See the following code:

recipe_arn = “arn:aws:personalize:::recipe/aws-user-personalization”

create_solution_response = personalize.create_solution(
name = “personalize-auto-context-demo-solution”,
datasetGroupArn = dataset_group_arn,
recipeArn = recipe_arn
)

create_solution_version_response = personalize.create_solution_version(
solutionArn = solution_arn
)

Create a campaign endpoint
After you train your model, you deploy it into a campaign. A campaign creates and manages an auto-scaling endpoint for your trained model that you can use to get personalized recommendations using the GetRecommendations API. In a later step, we use this campaign endpoint to automatically pass the device type as a context as a parameter and receive personalized recommendations. See the following code:

create_campaign_response = personalize.create_campaign(
name = “personalize-auto-context-demo-campaign”,
solutionVersionArn = solution_version_arn
)

Create a dynamic filter
When getting recommendations from the created campaign, you can filter results based on custom criteria. For our example, we create a filter to satisfy the requirement of recommending videos that are only allowed to be played from user’s current country. The country information is passed dynamically from the CloudFront HTTP header.

create_filter_response = personalize.create_filter(
name = ‘personalize-auto-context-demo-country-filter’,
datasetGroupArn = dataset_group_arn,
filterExpression = ‘INCLUDE ItemID WHERE Items.ALLOWED_COUNTRIES IN ($CONTEXT_COUNTRY)’
)

Create a Lambda function
The next step in our architecture is to create a Lambda function to process API requests coming from the CloudFront distribution and respond by invoking the Amazon Personalize campaign endpoint. In this Lambda function, we define logic to analyze the following CloudFront request’s HTTP headers and query string parameters to determine the user’s device type and user ID, respectively:

CloudFront-Is-Desktop-Viewer
CloudFront-Is-Mobile-Viewer
CloudFront-Is-SmartTV-Viewer
CloudFront-Is-Tablet-Viewer
CloudFront-Viewer-Country

The code to create this function is deployed through the CloudFormation template.
Create a REST API
To make the Lambda function and Amazon Personalize campaign endpoint accessible to the CloudFront distribution, we create a REST API endpoint set up as a Lambda proxy. API Gateway provides tools for creating and documenting APIs that route HTTP requests to Lambda functions. The Lambda proxy integration feature allows CloudFront to call a single Lambda function abstracting requests to the Amazon Personalize campaign endpoint. The code to create this function is deployed through the CloudFormation template.
Create a CloudFront distribution
When creating a CloudFront distribution, because this is a demo setup, we disable caching using a custom caching policy, ensuring the request goes to the origin every time. Additionally, we use an origin request policy specifying the required HTTP headers and query string parameters that are included in an origin request. The code to create this function is deployed through the CloudFormation template.
Test recommendations
When the CloudFront distribution’s URL is accessed from different devices (desktop, tablet, phone, and so on), we can see personalized video recommendations that are most relevant to their device. Also, if a cold user is presented, the recommendations tailored for user’s device are presented. In the following sample outputs, names of videos are only used for representation of their genre and runtime to make it relatable.
In the following code, a known user who loves comedy based on past interactions and is accessing from a phone device is presented with shorter sitcoms:

Recommendations for user: 460

ITEM_ID GENRE ALLOWED_COUNTRIES
380 Comedy RU|GR|LT|NO|SZ|VN
540 Sitcom US|PK|NI|JM|IN|DK
860 Comedy RU|GR|LT|NO|SZ|VN
600 Comedy US|PK|NI|JM|IN|DK
580 Comedy US|FI|CN|ES|HK|AE
900 Satire US|PK|NI|JM|IN|DK
720 Sitcom US|PK|NI|JM|IN|DK

The following known user is presented with feature films when accessing from a smart TV device based on past interactions:

Recommendations for user: 460

ITEM_ID GENRE ALLOWED_COUNTRIES
780 Romance US|PK|NI|JM|IN|DK
100 Horror US|FI|CN|ES|HK|AE
400 Action US|FI|CN|ES|HK|AE
660 Horror US|PK|NI|JM|IN|DK
720 Horror US|PK|NI|JM|IN|DK
820 Mystery US|FI|CN|ES|HK|AE
520 Mystery US|FI|CN|ES|HK|AE

A cold (unknown) user accessing from a phone is presented with shorter but popular shows:
Recommendations for user: 666

ITEM_ID GENRE ALLOWED_COUNTRIES
940 Satire US|FI|CN|ES|HK|AE
760 Satire US|FI|CN|ES|HK|AE
160 Sitcom US|FI|CN|ES|HK|AE
880 Comedy US|FI|CN|ES|HK|AE
360 Satire US|PK|NI|JM|IN|DK
840 Satire US|PK|NI|JM|IN|DK
420 Satire US|PK|NI|JM|IN|DK

A cold (unknown) user accessing from a desktop is presented with top science fiction films and documentaries:

Recommendations for user: 666

ITEM_ID GENRE ALLOWED_COUNTRIES
120 Science Fiction US|PK|NI|JM|IN|DK
160 Science Fiction US|FI|CN|ES|HK|AE
680 Science Fiction RU|GR|LT|NO|SZ|VN
640 Science Fiction US|FI|CN|ES|HK|AE
700 Documentary US|FI|CN|ES|HK|AE
760 Science Fiction US|FI|CN|ES|HK|AE
360 Documentary US|PK|NI|JM|IN|DK

The following known user accessing from a phone is returning filtered recommendations based on location (US):

Recommendations for user: 460

ITEM_ID GENRE ALLOWED_COUNTRIES
300 Sitcom US|PK|NI|JM|IN|DK
480 Satire US|PK|NI|JM|IN|DK
240 Comedy US|PK|NI|JM|IN|DK
900 Sitcom US|PK|NI|JM|IN|DK
880 Comedy US|FI|CN|ES|HK|AE
220 Sitcom US|FI|CN|ES|HK|AE
940 Sitcom US|FI|CN|ES|HK|AE

Conclusion
In this post, we described how to use user device type as contextual data to make your recommendations more relevant. Using contextual metadata to train Amazon Personalize models will help you recommend products that are relevant to both new and existing users, not just from the profile data but also from a browsing device platform. Not only that, context like location (country, city, region, postal code) and time (day of the week, weekend, weekday, season) opens up the opportunity to make recommendations relatable to the user. You can run the full code example by using the CloudFormation template provided in our GitHub repository and cloning the notebooks into Amazon SageMaker Studio.

About the Authors
Gilles-Kuessan Satchivi is an AWS Enterprise Solutions Architect with a background in networking, infrastructure, security, and IT operations. He is passionate about helping customers build Well-Architected systems on AWS. Before joining AWS, he worked in ecommerce for 17 years. Outside of work, he likes to spend time with his family and cheer on his children’s soccer team.
Aditya Pendyala is a Senior Solutions Architect at AWS based out of NYC. He has extensive experience in architecting cloud-based applications. He is currently working with large enterprises to help them craft highly scalable, flexible, and resilient cloud architectures, and guides them on all things cloud. He has a Master of Science degree in Computer Science from Shippensburg University and believes in the quote “When you cease to learn, you cease to grow.”
Prabhakar Chandrasekaran is a Senior Technical Account Manager with AWS Enterprise Support. Prabhakar enjoys helping customers build cutting-edge AI/ML solutions on the cloud. He also works with enterprise customers providing proactive guidance and operational assistance, helping them improve the value of their solutions when using AWS. Prabhakar holds six AWS and six other professional certifications. With over 20 years of professional experience, Prabhakar was a data engineer and a program leader in the financial services space prior to joining AWS.

Interactively fine-tune Falcon-40B and other LLMs on Amazon SageMaker …

Fine-tuning large language models (LLMs) allows you to adjust open-source foundational models to achieve improved performance on your domain-specific tasks. In this post, we discuss the advantages of using Amazon SageMaker notebooks to fine-tune state-of-the-art open-source models. We utilize Hugging Face’s parameter-efficient fine-tuning (PEFT) library and quantization techniques through bitsandbytes to support interactive fine-tuning of extremely large models using a single notebook instance. Specifically, we show how to fine-tune Falcon-40B using a single ml.g5.12xlarge instance (4 A10G GPUs), but the same strategy works to tune even larger models on p4d/p4de notebook instances.
Typically, the full precision representations of these very large models don’t fit into memory on a single or even several GPUs. To support an interactive notebook environment to fine-tune and run inference on models of this size, we use a new technique known as Quantized LLMs with Low-Rank Adapters (QLoRA). QLoRA is an efficient fine-tuning approach that reduces memory usage of LLMs while maintaining solid performance. Hugging Face and the authors of the paper mentioned have published a detailed blog post that covers the fundamentals and integrations with the Transformers and PEFT libraries.
Using notebooks to fine-tune LLMs
SageMaker comes with two options to spin up fully managed notebooks for exploring data and building machine learning (ML) models. The first option is fast start, collaborative notebooks accessible within Amazon SageMaker Studio, a fully integrated development environment (IDE) for ML. You can quickly launch notebooks in SageMaker Studio, dial up or down the underlying compute resources without interrupting your work, and even co-edit and collaborate on your notebooks in real time. In addition to creating notebooks, you can perform all the ML development steps to build, train, debug, track, deploy, and monitor your models in a single pane of glass in SageMaker Studio. The second option is a SageMaker notebook instance, a single, fully managed ML compute instance running notebooks in the cloud, which offers you more control over your notebook configurations.
For the remainder of this post, we use SageMaker Studio notebooks because we want to utilize SageMaker Studio’s managed TensorBoard experiment tracking with Hugging Face Transformer’s support for TensorBoard. However, the same concepts shown throughout the example code will work on notebook instances using the conda_pytorch_p310 kernel. It’s worth noting that SageMaker Studio’s Amazon Elastic File System (Amazon EFS) volume means you don’t need to provision a preordained Amazon Elastic Block Store (Amazon EBS) volume size, which is useful given the large size of model weights in LLMs.
Using notebooks backed by large GPU instances enables rapid prototyping and debugging without cold start container launches. However, it also means that you need to shut down your notebook instances when you’re done using them to avoid extra costs. Other options such as Amazon SageMaker JumpStart and SageMaker Hugging Face containers can be used for fine-tuning, and we recommend you refer to the following posts on the aforementioned methods to choose the best option for you and your team:

Domain-adaptation Fine-tuning of Foundation Models in Amazon SageMaker JumpStart on Financial data
Train a Large Language Model on a single Amazon SageMaker GPU with Hugging Face and LoRA

Prerequisites
If this is your first time working with SageMaker Studio, you first need to create a SageMaker domain. We also use a managed TensorBoard instance for experiment tracking, though that is optional for this tutorial.
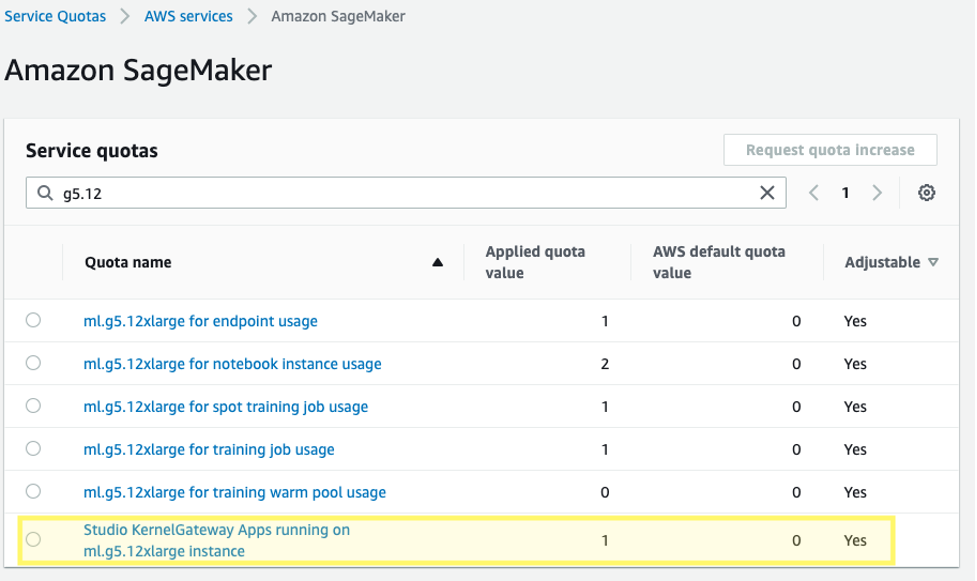
Additionally, you may need to request a service quota increase for the corresponding SageMaker Studio KernelGateway apps. For fine-tuning Falcon-40B, we use a ml.g5.12xlarge instance.
To request a service quota increase, on the AWS Service Quotas console, navigate to AWS services, Amazon SageMaker, and select Studio KernelGateway Apps running on ml.g5.12xlarge instances.
Get started
The code sample for this post can be found in the following GitHub repository. To begin, we choose the Data Science 3.0 image and Python 3 kernel from SageMaker Studio so that we have a recent Python 3.10 environment to install our packages.

We install PyTorch and the required Hugging Face and bitsandbytes libraries:

%pip install -q -U torch==2.0.1 bitsandbytes==0.39.1
%pip install -q -U datasets py7zr einops tensorboardX
%pip install -q -U git+https://github.com/huggingface/transformers.git@850cf4af0ce281d2c3e7ebfc12e0bc24a9c40714
%pip install -q -U git+https://github.com/huggingface/peft.git@e2b8e3260d3eeb736edf21a2424e89fe3ecf429d
%pip install -q -U git+https://github.com/huggingface/accelerate.git@b76409ba05e6fa7dfc59d50eee1734672126fdba

Next, we set the CUDA environment path using the installed CUDA that was a dependency of PyTorch installation. This is a required step for the bitsandbytes library to correctly find and load the correct CUDA shared object binary.

# Add installed cuda runtime to path for bitsandbytes
import os
import nvidia

cuda_install_dir = ‘/’.join(nvidia.__file__.split(‘/’)[:-1]) + ‘/cuda_runtime/lib/’
os.environ[‘LD_LIBRARY_PATH’] =  cuda_install_dir

Load the pre-trained foundational model
We use bitsandbytes to quantize the Falcon-40B model into 4-bit precision so that we can load the model into memory on 4 A10G GPUs using Hugging Face Accelerate’s naive pipeline parallelism. As described in the previously mentioned Hugging Face post, QLoRA tuning is shown to match 16-bit fine-tuning methods in a wide range of experiments because model weights are stored as 4-bit NormalFloat, but are dequantized to the computation bfloat16 on forward and backward passes as needed.

model_id = “tiiuae/falcon-40b”
bnb_config = BitsAndBytesConfig(
load_in_4bit=True,
bnb_4bit_use_double_quant=True,
bnb_4bit_quant_type=”nf4″,
bnb_4bit_compute_dtype=torch.bfloat16
)

When loading the pretrained weights, we specify device_map=”auto” so that Hugging Face Accelerate will automatically determine which GPU to put each layer of the model on. This process is known as model parallelism.

# Falcon requires you to allow remote code execution. This is because the model uses a new architecture that is not part of transformers yet.
# The code is provided by the model authors in the repo.
model = AutoModelForCausalLM.from_pretrained(model_id, trust_remote_code=True, quantization_config=bnb_config, device_map=”auto”)

With Hugging Face’s PEFT library, you can freeze most of the original model weights and replace or extend model layers by training an additional, much smaller, set of parameters. This makes training much less expensive in terms of required compute. We set the Falcon modules that we want to fine-tune as target_modules in the LoRA configuration:

from peft import LoraConfig, get_peft_model

config = LoraConfig(
r=8,
lora_alpha=32,
target_modules=[
“query_key_value”,
“dense”,
“dense_h_to_4h”,
“dense_4h_to_h”,
],
lora_dropout=0.05,
bias=”none”,
task_type=”CAUSAL_LM”
)

model = get_peft_model(model, config)
print_trainable_parameters(model)
# Output: trainable params: 55541760 || all params: 20974518272|| trainable%: 0.2648058910327664

Notice that we’re only fine-tuning 0.26% of the model’s parameters, which makes this feasible in a reasonable amount of time.
Load a dataset
We use the samsum dataset for our fine-tuning. Samsum is a collection of 16,000 messenger-like conversations with labeled summaries. The following is an example of the dataset:

{
“id”: “13818513”,
“summary”: “Amanda baked cookies and will bring Jerry some tomorrow.”,
“dialogue”: “Amanda: I baked cookies. Do you want some?rnJerry: Sure!rnAmanda: I’ll bring you tomorrow :-)”
}

In practice, you’ll want to use a dataset that has specific knowledge to the task you are hoping to tune your model on. The process of building such a dataset can be accelerated by using Amazon SageMaker Ground Truth Plus, as described in High-quality human feedback for your generative AI applications from Amazon SageMaker Ground Truth Plus.
Fine-tune the model
Prior to fine-tuning, we define the hyperparameters we want to use and train the model. We can also log our metrics to TensorBoard by defining the parameter logging_dir and requesting the Hugging Face transformer to report_to=”tensorboard”:

bucket = ”<YOUR-S3-BUCKET>”
log_bucket = f”s3://{bucket}/falcon-40b-qlora-finetune”

import transformers

# We set num_train_epochs=1 simply to run a demonstration

trainer = transformers.Trainer(
model=model,
train_dataset=lm_train_dataset,
eval_dataset=lm_test_dataset,
args=transformers.TrainingArguments(
per_device_train_batch_size=8,
per_device_eval_batch_size=8,
logging_dir=log_bucket,
logging_steps=2,
num_train_epochs=1,
learning_rate=2e-4,
bf16=True,
save_strategy = “no”,
output_dir=”outputs”,
 report_to=”tensorboard”,
),
data_collator=transformers.DataCollatorForLanguageModeling(tokenizer, mlm=False),
)

Monitor the fine-tuning
With the preceding setup, we can monitor our fine-tuning in real time. To monitor GPU usage in real time, we can run nvidia-smi directly from the kernel’s container. To launch a terminal running on the image container, simply choose the terminal icon at the top of your notebook.

From here, we can use the Linux watch command to repeatedly run nvidia-smi every half second:

watch -n 0.5 nvidia-smi

In the preceding animation, we can see that the model weights are distributed across the 4 GPUs and computation is being distributed across them as layers are processed serially.
To monitor the training metrics, we utilize the TensorBoard logs that we write to the specified Amazon Simple Storage Service (Amazon S3) bucket. We can launch our SageMaker Studio domain user’s TensorBoard from the AWS SageMaker console:

After loading, you can specify the S3 bucket that you instructed the Hugging Face transformer to log to in order to view training and evaluation metrics.

Evaluate the model
After our model is finished training, we can run systematic evaluations or simply generate responses:

tokens_for_summary = 30
output_tokens = input_ids.shape[1] + tokens_for_summary

outputs = model.generate(inputs=input_ids, do_sample=True, max_length=output_tokens)
gen_text = tokenizer.batch_decode(outputs)[0]
print(gen_text)
# Sample output:
# Summarize the chat dialogue:
# Richie: Pogba
# Clay: Pogboom
# Richie: what a s strike yoh!
# Clay: was off the seat the moment he chopped the ball back to his right foot
# Richie: me too dude
# Clay: hope his form lasts
# Richie: This season he’s more mature
# Clay: Yeah, Jose has his trust in him
# Richie: everyone does
# Clay: yeah, he really deserved to score after his first 60 minutes
# Richie: reward
# Clay: yeah man
# Richie: cool then
# Clay: cool
# —
# Summary:
# Richie and Clay have discussed the goal scored by Paul Pogba. His form this season has improved and both of them hope this will last long

After you are satisfied with the model’s performance, you can save the model:

trainer.save_model(“path_to_save”)

You can also choose to host it in a dedicated SageMaker endpoint.
Clean up
Complete the following steps to clean up your resources:

Shut down the SageMaker Studio instances to avoid incurring additional costs.
Shut down your TensorBoard application.
Clean up your EFS directory by clearing the Hugging Face cache directory:

rm -R ~/.cache/huggingface/hub

Conclusion
SageMaker notebooks allow you to fine-tune LLMs in a quick and efficient manner in an interactive environment. In this post, we showed how you can use Hugging Face PEFT with bitsandbtyes to fine-tune Falcon-40B models using QLoRA on SageMaker Studio notebooks. Try it out, and let us know your thoughts in the comments section!
We also encourage you to learn more about Amazon generative AI capabilities by exploring SageMaker JumpStart, Amazon Titan models, and Amazon Bedrock.

About the Authors
Sean Morgan is a Senior ML Solutions Architect at AWS. He has experience in the semiconductor and academic research fields, and uses his experience to help customers reach their goals on AWS. In his free time, Sean is an active open-source contributor and maintainer, and is the special interest group lead for TensorFlow Addons.
Lauren Mullennex is a Senior AI/ML Specialist Solutions Architect at AWS. She has a decade of experience in DevOps, infrastructure, and ML. She is also the author of a book on computer vision. Her other areas of focus include MLOps and generative AI.
Philipp Schmid is a Technical Lead at Hugging Face with the mission to democratize good machine learning through open source and open science. Philipp is passionate about productionizing cutting-edge and generative AI machine learning models. He loves to share his knowledge on AI and NLP at various meetups such as Data Science on AWS, and on his technical blog.

Meet ProFusion: An AI Regularization-Free Framework For Detail Preserv …

The field of text-to-image generation has been extensively explored over the years, and significant progress has been made recently. Researchers have achieved remarkable advancements by training large-scale models on extensive datasets, enabling zero-shot text-to-image generation with arbitrary text inputs. Groundbreaking works like DALL-E and CogView have paved the way for numerous methods proposed by researchers, resulting in impressive capabilities to generate high-resolution images aligned with textual descriptions, exhibiting exceptional fidelity. These large-scale models have not only revolutionized text-to-image generation but have also had a profound impact on various other applications, including image manipulation and video generation.

While the aforementioned large-scale text-to-image generation models excel at producing text-aligned and creative outputs, they often encounter challenges when it comes to generating novel and unique concepts as specified by users. As a result, researchers have explored various methods to customize pre-trained text-to-image generation models.

For instance, some approaches involve fine-tuning the pre-trained generative models using a limited number of samples. To prevent overfitting, different regularization techniques are employed. Other methods aim to encode the novel concept provided by the user into a word embedding. This embedding is obtained either through an optimization process or from an encoder network. These approaches enable the customized generation of novel concepts while meeting additional requirements specified in the user’s input text.

Despite the significant progress in text-to-image generation, recent research has raised concerns about the potential limitations of customization when employing regularization methods. There is suspicion that these regularization techniques may inadvertently restrict the capability of customized generation, resulting in the loss of fine-grained details.

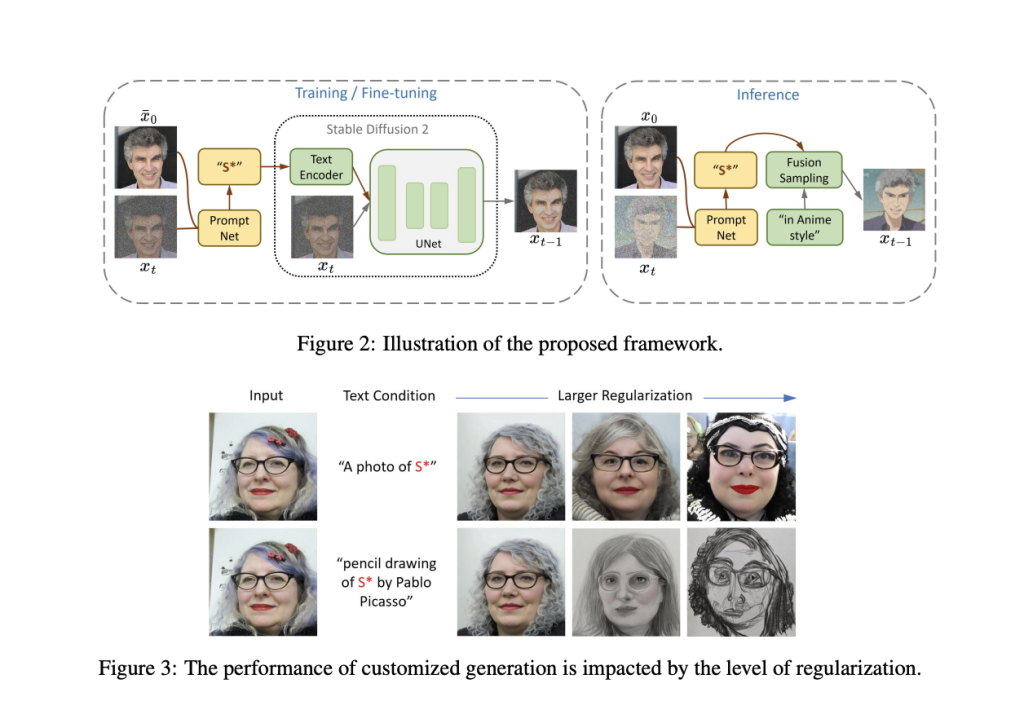
To overcome this challenge, a novel framework called ProFusion has been proposed. Its architecture is presented below.

ProFusion consists of a pre-trained encoder called PromptNet, which infers the conditioning word embedding from an input image and random noise, and a novel sampling method called Fusion Sampling. In contrast to previous methods, ProFusion eliminates the requirement for regularization during the training process. Instead, the problem is effectively addressed during inference using the Fusion Sampling method. 

Indeed, the authors argue that although regularization enables faithful content creation conditioned by text, it also leads to the loss of detailed information, resulting in inferior performance.

Fusion Sampling consists of two stages at each timestep. The first step involves a fusion stage which encodes information from both the input image embedding and the conditioning text into a noisy partial outcome. Afterward, a refinement stage follows, which updates the prediction based on chosen hyper-parameters. Updating the prediction helps Fusion Sampling preserve fine-grained information from the input image while conditioning the output on the input prompt.

This approach not only saves training time but also obviates the need for tuning hyperparameters related to regularization methods.

The results reported below talk for themselves.

We can see a comparison between ProFusion and state-of-the-art approaches. The proposed approach outperforms all other presented techniques, preserving fine-grained details mainly related to facial traits.

This was the summary of ProFusion, a novel regularization-free framework for text-to-image generation with state-of-the-art quality. If you are interested, you can learn more about this technique in the links below.

Check Out The Paper and Github Link. Don’t forget to join our 25k+ ML SubReddit, Discord Channel, and Email Newsletter, where we share the latest AI research news, cool AI projects, and more. If you have any questions regarding the above article or if we missed anything, feel free to email us at Asif@marktechpost.com

Check Out 100’s AI Tools in AI Tools Club
The post Meet ProFusion: An AI Regularization-Free Framework For Detail Preservation In Text-to-Image Synthesis appeared first on MarkTechPost.
Meet Google’s New Anti-Money-Laundering AI Tool for Banks

Google Cloud, a division of Alphabet, has introduced Anti Money Laundering AI for banks. The proposed AI solution is an innovative tool driven by artificial intelligence (AI) that aims to revolutionize anti-money laundering efforts in the financial industry. The product utilizes machine learning techniques to assist banks and other financial institutions in meeting regulatory requirements for identifying and reporting suspicious activities related to money laundering.

What sets Google Cloud’s solution apart is its departure from traditional rules-based programming commonly used in anti-money laundering surveillance systems. This unconventional design choice challenges industry norms and has attracted the attention of major players such as HSBC, Banco Bradesco, and Lunar.

This release aligns with the ongoing trend among leading US tech companies leveraging AI to enhance various sectors. Google’s previous success with ChatGPT has prompted other corporations to integrate similar AI technologies into their operations.

Financial institutions have long relied on AI to analyze large volumes of daily transactions. Typically, human judgment and machine learning are used to identify potentially suspicious activities that need to be reported to regulators.

Google Cloud’s decision to move away from rules-based systems represents a significant bet on AI’s potential to address persistent challenges in anti-money laundering. The calibration of such tools often results in too few or too many flagged activities, which can raise concerns or overwhelm compliance teams. The inclusion of manual rules input further contributes to high false favorable rates.

With an AI-first approach, Google Cloud aims to mitigate these challenges. Users of the tool can customize it with their risk indicators, reducing the number of unnecessary alerts by up to 60% while increasing accuracy. HSBC, for example, experienced up to four times more “true positives” after implementing Google Cloud’s solution.

Convincing financial institutions to trust machine learning for decision-making can be challenging. Regulators expect clear rationales tailored to specific risk profiles, and skepticism remains regarding the ability of machine learning to replace human expertise completely. To address these concerns, Google Cloud ensures better results and enhanced “explainability” in their solution. The tool leverages diverse data sources to identify high-risk customers, providing detailed information on transactions and contextual factors. This transparency fosters trust and facilitates understanding among financial institutions and regulators.

Google Cloud’s AI-driven anti-money laundering solution has the potential to transform efforts to combat illicit financial activities. The solution promises enhanced accuracy, customization, and transparency by shifting towards machine learning, fostering confidence among financial institutions and regulators in their anti-money laundering efforts.

Check Out The Reference Article. Don’t forget to join our 25k+ ML SubReddit, Discord Channel, and Email Newsletter, where we share the latest AI research news, cool AI projects, and more. If you have any questions regarding the above article or if we missed anything, feel free to email us at Asif@marktechpost.com

Check Out 100’s AI Tools in AI Tools Club
The post Meet Google’s New Anti-Money-Laundering AI Tool for Banks appeared first on MarkTechPost.

Transforming Specialized AI Training- Meet LMFlow: A Promising Toolkit …

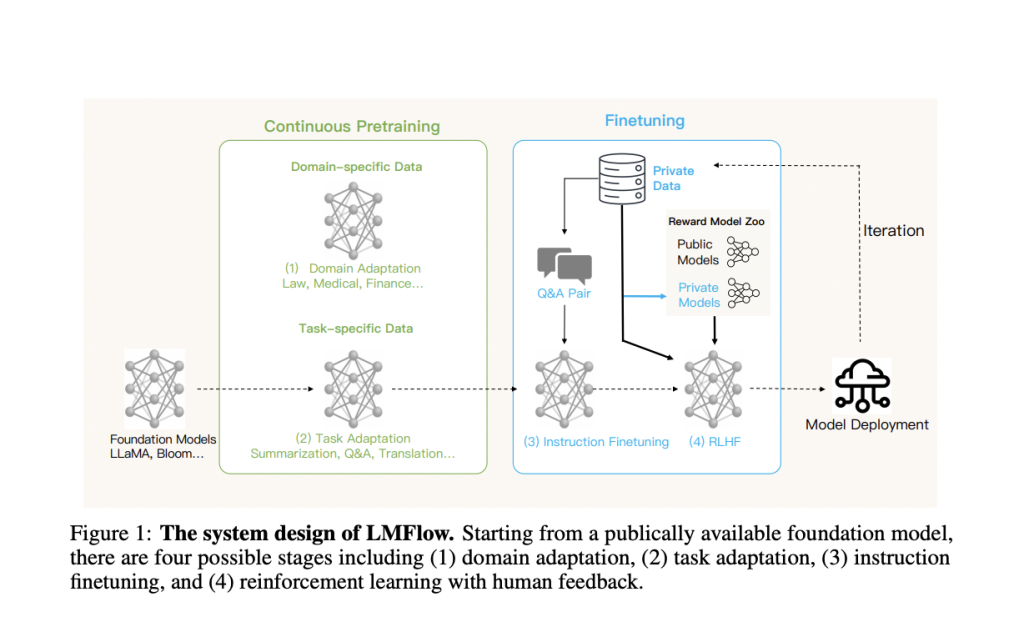
Large language models (LLMs) built on top of big foundation models have shown the general ability to execute various tasks that were impossible before. However, more finetuning of such LLMs is required to increase performance on specialized domains or jobs. Common procedures for finetuning such big models include:

Ongoing pretraining in niche areas, allowing a broad base model to pick up expertise in such areas.

Tuning of instructions to train a big, general-purpose base model to understand and carry out certain types of natural-language instructions. 

Training a big foundation model with the necessary conversational abilities using RLHF (reinforcement learning with human feedback).

While several big models have already been pretrained and made available to the public (GPT-J, Bloom, LLaMA, etc.), no publicly available toolbox can efficiently carry out finetuning operations across all these models.

To help developers and researchers finetune and infer huge models efficiently with constrained resources, a team of academics from Hong Kong University and Princeton University has created an easy-to-use and lightweight toolset.

One Nvidia 3090 GPU and five hours are all it takes to train a custom model based on a 7-billion-parameter LLaMA model. The team has provided the model weights for academic research after using this framework to finetune versions of LLaMA with 7, 13, 33, and 65 billion parameters on a single machine.

There are four steps to optimizing the output of a large language model that is freely available online:

The first step, “domain adaptation,” entails training the model on a certain domain to handle it better. 

Task adaptation is the second step, and it entails training the model to accomplish a particular goal, such as summarization, question answering, or translation. 

Adjusting the model’s parameters based on instructional question-answer pairings is the third stage, instruction finetuning. 

The last step is reinforcement learning using human feedback, which entails refining the model based on people’s opinions. 

LMFlow offers a full finetuning procedure for these four steps, allowing for individualized training of huge language models despite constrained computational resources. 

LMFlow offers a thorough finetuning approach for big models with features like continuous pretraining, instruction tuning, and RLHF, as well as easy and flexible APIs. Individualized model training is now accessible to everyone with LMFlow. For activities like question answering, companionship, writing, translation, and expert consultations in various subjects, each person can pick a suitable model based on their available resources. If users have a large enough model and dataset, training over a longer period will yield superior outcomes. The team has recently trained a 33B model that outperforms ChatGPT.

Check Out The Paper and Github Link. Don’t forget to join our 25k+ ML SubReddit, Discord Channel, and Email Newsletter, where we share the latest AI research news, cool AI projects, and more. If you have any questions regarding the above article or if we missed anything, feel free to email us at Asif@marktechpost.com

Check Out 100’s AI Tools in AI Tools Club
The post Transforming Specialized AI Training- Meet LMFlow: A Promising Toolkit to Efficiently Fine-Tune and Personalize Large Foundation Models for Superior Performance appeared first on MarkTechPost.

Capture public health insights more quickly with no-code machine learn …

Public health organizations have a wealth of data about different types of diseases, health trends, and risk factors. Their staff has long used statistical models and regression analyses to make important decisions such as targeting populations with the highest risk factors for a disease with therapeutics, or forecasting the progression of concerning outbreaks.
When public health threats emerge, data velocity increases, incoming datasets can grow larger, and data management becomes more challenging. This makes it more difficult to analyze data holistically and capture insights from it. And when time is of the essence, speed and agility in analyzing data and drawing insights from it are key blockers to forming rapid and robust health responses.
Typical questions public health organizations face during times of stress include:

Will there be sufficient therapeutics in a certain location?
What risk factors are driving health outcomes?
Which populations have a higher risk of reinfection?

Because answering these questions requires understanding complex relationships between many different factors—often changing and dynamic—one powerful tool we have at our disposal is machine learning (ML), which can be deployed to analyze, predict, and solve these complex quantitative problems. We have increasingly seen ML applied to address difficult health-related problems such as classifying brain tumors with image analysis and predicting the need for mental health to deploy early intervention programs.
But what happens if public health organizations are in short supply of the skills required to apply ML to these questions? The application of ML to public health problems is impeded, and public health organizations lose the ability to apply powerful quantitative tools to address their challenges.
So how do we remove these bottlenecks? The answer is to democratize ML and allow a larger number of health professionals with deep domain expertise to use it and apply it to the questions they want to solve.
Amazon SageMaker Canvas is a no-code ML tool that empowers public health professionals such as epidemiologists, informaticians, and bio-statisticians to apply ML to their questions, without requiring a data science background or ML expertise. They can spend their time on the data, apply their domain expertise, quickly test hypothesis, and quantify insights. Canvas helps make public health more equitable by democratizing ML, allowing health experts to evaluate large datasets and empowering them with advanced insights using ML.
In this post, we show how public health experts can forecast on-hand demand for a certain therapeutic for the next 30 days using Canvas. Canvas provides you with a visual interface that allows you to generate accurate ML predictions on your own without requiring any ML experience or having to write a single line of code.
Solution overview
Let’s say we are working on data that we collected from states across the US. We may form a hypothesis that a certain municipality or location doesn’t have enough therapeutics in the coming weeks. How can we test this quickly and with a high degree of accuracy?
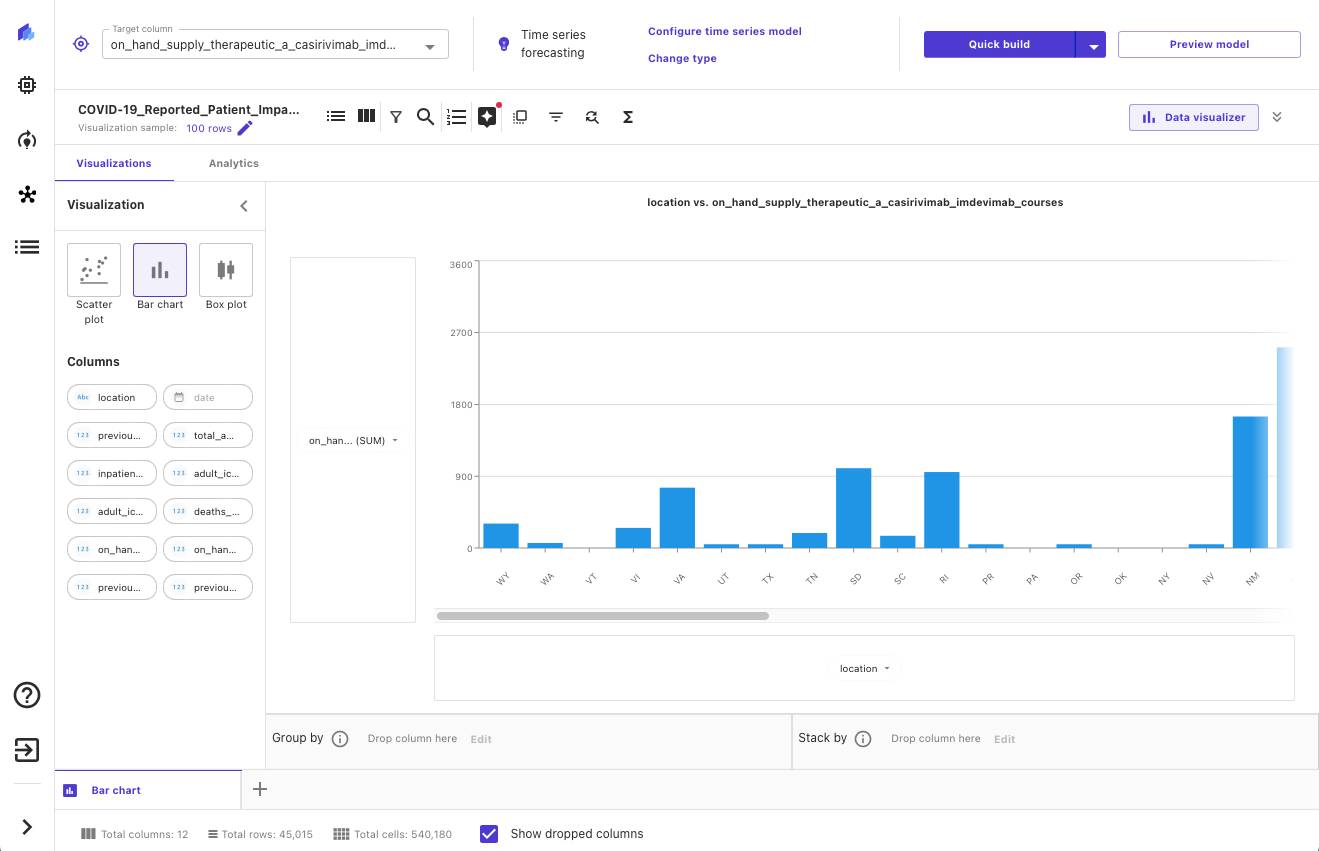
For this post, we use a publicly available dataset from the US Department of Health and Human Services, which contains state-aggregated time series data related to COVID-19, including hospital utilization, availability of certain therapeutics, and much more. The dataset (COVID-19 Reported Patient Impact and Hospital Capacity by State Timeseries (RAW)) is downloadable from healthdata.gov, and has 135 columns and over 60,000 rows. The dataset is updated periodically.
In the following sections, we demonstrate how to perform exploratory data analysis and preparation, build the ML forecasting model, and generate predictions using Canvas.
Perform exploratory data analysis and preparation
When doing a time series forecast in Canvas, we need to reduce the number of features or columns according to the service quotas. Initially, we reduce the number of columns to the 12 that are likely to be the most relevant. For example, we dropped the age-specific columns because we’re looking to forecast total demand. We also dropped columns whose data was similar to other columns we kept. In future iterations, it is reasonable to experiment with retaining other columns and using feature explainability in Canvas to quantify the importance of these features and which we want to keep. We also rename the state column to location.
Looking at the dataset, we also decide to remove all the rows for 2020, because there were limited therapeutics available at that time. This allows us to reduce the noise and improve the quality of the data for the ML model to learn from.
Reducing the number of columns can be done in different ways. You can edit the dataset in a spreadsheet, or directly inside Canvas using the user interface.
You can import data into Canvas from various sources, including from local files from your computer, Amazon Simple Storage Service (Amazon S3) buckets, Amazon Athena, Snowflake (see Prepare training and validation dataset for facies classification using Snowflake integration and train using Amazon SageMaker Canvas), and over 40 additional data sources.
After our data has been imported, we can explore and visualize our data to get additional insights into it, such as with scatterplots or bar charts. We also look at the correlation between different features to ensure that we have selected what we think are the best ones. The following screenshot shows an example visualization.

Build the ML forecasting model
Now we’re ready to create our model, which we can do with just a few clicks. We choose the column identifying on-hand therapeutics as our target. Canvas automatically identifies our problem as a time series forecast based on the target column we just selected, and we can configure the parameters needed.
We configure the item_id, the unique identifier, as location because our dataset is provided by location (US states). Because we’re creating a time series forecast, we need to select a time stamp, which is date in our dataset. Finally, we specify how many days into the future we want to forecast (for this example, we choose 30 days). Canvas also offers the ability to include a holiday schedule to improve accuracy. In this case, we use US holidays because this is a US-based dataset.
With Canvas, you can get insights from your data before you build a model by choosing Preview model. This saves you time and cost by not building a model if the results are unlikely to be satisfactory. By previewing our model, we realize that the impact of some columns is low, meaning the expected value of the column to the model is low. We remove columns by deselecting them in Canvas (red arrows in the following screenshot) and see an improvement in an estimated quality metric (green arrow).

Moving on to building our model, we have two options, Quick build and Standard build. Quick build produces a trained model in less than 20 minutes, prioritizing speed over accuracy. This is great for experimentation, and is a more thorough model than the preview model. Standard build produces a trained model in under 4 hours, prioritizing accuracy over latency, iterating through a number of model configurations to automatically select the best model.
First, we experiment with Quick build to validate our model preview. Then, because we’re happy with the model, we choose Standard build to have Canvas help build the best possible model for our dataset. If the Quick build model had produced unsatisfactory results, then we would go back and adjust the input data to capture a higher level of accuracy. We could accomplish this by, for instance, adding or removing columns or rows in our original dataset. The Quick build model supports rapid experimentation without having to rely on scarce data science resources or wait for a full model to be completed.
Generate predictions
Now that the model has been built, we can predict the availability of therapeutics by location. Let’s look at what our estimated on-hand inventory looks like for the next 30 days, in this case for Washington, DC.
Canvas outputs probabilistic forecasts for therapeutic demand, allowing us to understand both the median value as well as upper and lower bounds. In the following screenshot, you can see the tail end of the historical data (the data from the original dataset). You can then see three new lines: the median (50th quantile) forecast in purple, the lower bound (10th quantile) in light blue, and upper bound (90th quantile) in dark blue.

Examining upper and lower bounds provides insight into the probability distribution of the forecast and allows us to make informed decisions about desired levels of local inventory for this therapeutic. We can add this insight to other data (for example, disease progression forecasts, or therapeutic efficacy and uptake) to make informed decisions about future orders and inventory levels.
Conclusion
No-code ML tools empower public health experts to quickly and effectively apply ML to public health threats. This democratization of ML makes public health organizations more agile and more efficient in their mission of protecting public health. Ad hoc analyses that can identify important trends or inflection points in public health concerns can now be performed directly by specialists, without having to compete for limited ML expert resources and slowing down response times and decision-making.
In this post, we showed how someone without any knowledge of ML can use Canvas to forecast the on-hand inventory of a certain therapeutic. This analysis can be performed by any analyst in the field, through the power of cloud technologies and no-code ML. Doing so distributes capabilities broadly and allows public health agencies to be more responsive, and to more efficiently use centralized and field office resources to deliver better public health outcomes.
What are some of the questions you might be asking, and how may low-code/no-code tools be able to help you answer them? If you are interested in learning more about Canvas, refer to Amazon SageMaker Canvas and start applying ML to your own quantitative health questions.

About the authors
Henrik Balle is a Sr. Solutions Architect at AWS supporting the US Public Sector. He works closely with customers on a range of topics from machine learning to security and governance at scale. In his spare time, he loves road biking, motorcycling, or you might find him working on yet another home improvement project.
Dan Sinnreich leads Go to Market product management for Amazon SageMaker Canvas and Amazon Forecast. He is focused on democratizing low-code/no-code machine learning and applying it to improve business outcomes. Previous to AWS Dan built enterprise SaaS platforms and time-series risk models used by institutional investors to manage risk and construct portfolios. Outside of work, he can be found playing hockey, scuba diving, traveling, and reading science fiction.

Safe image generation and diffusion models with Amazon AI content mode …

Generative AI technology is improving rapidly, and it’s now possible to generate text and images based on text input. Stable Diffusion is a text-to-image model that empowers you to create photorealistic applications. You can easily generate images from text using Stable Diffusion models through Amazon SageMaker JumpStart.
The following are examples of input texts and the corresponding output images generated by Stable Diffusion. The inputs are “A boxer dancing on a table,” “A lady on the beach in swimming wear, water color style,” and “A dog in a suit.”

Although generative AI solutions are powerful and useful, they can also be vulnerable to manipulation and abuse. Customers using them for image generation must prioritize content moderation to protect their users, platform, and brand by implementing strong moderation practices to create a safe and positive user experience while safeguarding their platform and brand reputation.
In this post, we explore using AWS AI services Amazon Rekognition and Amazon Comprehend, along with other techniques, to effectively moderate Stable Diffusion model-generated content in near-real time. To learn how to launch and generate images from text using a Stable Diffusion model on AWS, refer to Generate images from text with the stable diffusion model on Amazon SageMaker JumpStart.
Solution overview
Amazon Rekognition and Amazon Comprehend are managed AI services that provide pre-trained and customizable ML models via an API interface, eliminating the need for machine learning (ML) expertise. Amazon Rekognition Content Moderation automates and streamlines image and video moderation. Amazon Comprehend utilizes ML to analyze text and uncover valuable insights and relationships.
The following reference illustrates the creation of a RESTful proxy API for moderating Stable Diffusion text-to-image model-generated images in near-real time. In this solution, we launched and deployed a Stable Diffusion model (v2-1 base) using JumpStart. The solution uses negative prompts and text moderation solutions such as Amazon Comprehend and a rule-based filter to moderate input prompts. It also utilizes Amazon Rekognition to moderate the generated images. The RESTful API will return the generated image and the moderation warnings to the client if unsafe information is detected.

The steps in the workflow are as follows:

The user send a prompt to generate an image.
An AWS Lambda function coordinates image generation and moderation using Amazon Comprehend, JumpStart, and Amazon Rekognition:

Apply a rule-based condition to input prompts in Lambda functions, enforcing content moderation with forbidden word detection.
Use the Amazon Comprehend custom classifier to analyze the prompt text for toxicity classification.
Send the prompt to the Stable Diffusion model through the SageMaker endpoint, passing both the prompts as user input and negative prompts from a predefined list.
Send the image bytes returned from the SageMaker endpoint to the Amazon Rekognition DetectModerationLabel API for image moderation.
Construct a response message that includes image bytes and warnings if the previous steps detected any inappropriate information in the prompt or generative image.

Send the response back to the client.

The following screenshot shows a sample app built using the described architecture. The web UI sends user input prompts to the RESTful proxy API and displays the image and any moderation warnings received in the response. The demo app blurs the actual generated image if it contains unsafe content. We tested the app with the sample prompt “A sexy lady.”

You can implement more sophisticated logic for a better user experience, such as rejecting the request if the prompts contain unsafe information. Additionally, you could have a retry policy to regenerate the image if the prompt is safe, but the output is unsafe.
Predefine a list of negative prompts
Stable Diffusion supports negative prompts, which lets you specify prompts to avoid during image generation. Creating a predefined list of negative prompts is a practical and proactive approach to prevent the model from producing unsafe images. By including prompts like “naked,” “sexy,” and “nudity,” which are known to lead to inappropriate or offensive images, the model can recognize and avoid them, reducing the risk of generating unsafe content.
The implementation can be managed in the Lambda function when calling the SageMaker endpoint to run inference of the Stable Diffusion model, passing both the prompts from user input and the negative prompts from a predefined list.
Although this approach is effective, it could impact the results generated by the Stable Diffusion model and limit its functionality. It’s important to consider it as one of the moderation techniques, combined with other approaches such as text and image moderation using Amazon Comprehend and Amazon Rekognition.
Moderate input prompts
A common approach to text moderation is to use a rule-based keyword lookup method to identify whether the input text contains any forbidden words or phrases from a predefined list. This method is relatively easy to implement, with minimal performance impact and lower costs. However, the major drawback of this approach is that it’s limited to only detecting words included in the predefined list and can’t detect new or modified variations of forbidden words not included in the list. Users can also attempt to bypass the rules by using alternative spellings or special characters to replace letters.
To address the limitations of a rule-based text moderation, many solutions have adopted a hybrid approach that combines rule-based keyword lookup with ML-based toxicity detection. The combination of both approaches allows for a more comprehensive and effective text moderation solution, capable of detecting a wider range of inappropriate content and improving the accuracy of moderation outcomes.
In this solution, we use an Amazon Comprehend custom classifier to train a toxicity detection model, which we use to detect potentially harmful content in input prompts in cases where no explicit forbidden words are detected. With the power of machine learning, we can teach the model to recognize patterns in text that may indicate toxicity, even when such patterns aren’t easily detectable by a rule-based approach.
With Amazon Comprehend as a managed AI service, training and inference are simplified. You can easily train and deploy Amazon Comprehend custom classification with just two steps. Check out our workshop lab for more information about the toxicity detection model using an Amazon Comprehend custom classifier. The lab provides a step-by-step guide to creating and integrating a custom toxicity classifier into your application. The following diagram illustrates this solution architecture.

This sample classifier uses a social media training dataset and performs binary classification. However, if you have more specific requirements for your text moderation needs, consider using a more tailored dataset to train your Amazon Comprehend custom classifier.
Moderate output images
Although moderating input text prompts is important, it doesn’t guarantee that all images generated by the Stable Diffusion model will be safe for the intended audience, because the model’s outputs can contain a certain level of randomness. Therefore, it’s equally important to moderate the images generated by the Stable Diffusion model.
In this solution, we utilize Amazon Rekognition Content Moderation, which employs pre-trained ML models, to detect inappropriate content in images and videos. In this solution, we use the Amazon Rekognition DetectModerationLabel API to moderate images generated by the Stable Diffusion model in near-real time. Amazon Rekognition Content Moderation provides pre-trained APIs to analyze a wide range of inappropriate or offensive content, such as violence, nudity, hate symbols, and more. For a comprehensive list of Amazon Rekognition Content Moderation taxonomies, refer to Moderating content.
The following code demonstrates how to call the Amazon Rekognition DetectModerationLabel API to moderate images within an Lambda function using the Python Boto3 library. This function takes the image bytes returned from SageMaker and sends them to the Image Moderation API for moderation.

import boto3

# Initialize the Amazon Rekognition client object
rekognition = boto3.client(‘rekognition’)

# Call the Rekognition Image moderation API and store the results
response = rekognition.detect_moderation_labels(
Image={
‘Bytes’: base64.b64decode(img_bytes)
}
)

# Printout the API response
print(response)

For additional examples of the Amazon Rekognition Image Moderation API, refer to our Content Moderation Image Lab.
Effective image moderation techniques for fine-tuning models
Fine-tuning is a common technique used to adapt pre-trained models to specific tasks. In the case of Stable Diffusion, fine-tuning can be used to generate images that incorporate specific objects, styles, and characters. Content moderation is critical when training a Stable Diffusion model to prevent the creation of inappropriate or offensive images. This involves carefully reviewing and filtering out any data that could lead to the generation of such images. By doing so, the model learns from a more diverse and representative range of data points, improving its accuracy and preventing the propagation of harmful content.
JumpStart makes fine-tuning the Stable Diffusion Model easy by providing the transfer learning scripts using the DreamBooth method. You just need to prepare your training data, define the hyperparameters, and start the training job. For more details, refer to Fine-tune text-to-image Stable Diffusion models with Amazon SageMaker JumpStart.
The dataset for fine-tuning needs to be a single Amazon Simple Storage Service (Amazon S3) directory including your images and instance configuration file dataset_info.json, as shown in the following code. The JSON file will associate the images with the instance prompt like this: {‘instance_prompt’:<<instance_prompt>>}.

input_directory
|—instance_image_1.png
|—instance_image_2.png
|—instance_image_3.png
|—instance_image_4.png
|—instance_image_5.png
|—dataset_info.json

Obviously, you can manually review and filter the images, but this can be time-consuming and even impractical when you do this at scale across many projects and teams. In such cases, you can automate a batch process to centrally check all the images against the Amazon Rekognition DetectModerationLabel API and automatically flag or remove images so they don’t contaminate your training.
Moderation latency and cost
In this solution, a sequential pattern is used to moderate text and images. A rule-based function and Amazon Comprehend are called for text moderation, and Amazon Rekognition is used for image moderation, both before and after invoking Stable Diffusion. Although this approach effectively moderates input prompts and output images, it may increase the overall cost and latency of the solution, which is something to consider.
Latency
Both Amazon Rekognition and Amazon Comprehend offer managed APIs that are highly available and have built-in scalability. Despite potential latency variations due to input size and network speed, the APIs used in this solution from both services offer near-real-time inference. Amazon Comprehend custom classifier endpoints can offer a speed of less than 200 milliseconds for input text sizes of less than 100 characters, while the Amazon Rekognition Image Moderation API serves approximately 500 milliseconds for average file sizes of less than 1 MB. (The results are based on the test conducted using the sample application, which qualifies as a near-real-time requirement.)
In total, the moderation API calls to Amazon Rekognition and Amazon Comprehend will add up to 700 milliseconds to the API call. It’s important to note that the Stable Diffusion request usually takes longer depending on the complexity of the prompts and the underlying infrastructure capability. In the test account, using an instance type of ml.p3.2xlarge, the average response time for the Stable Diffusion model via a SageMaker endpoint was around 15 seconds. Therefore, the latency introduced by moderation is approximately 5% of the overall response time, making it a minimal impact on the overall performance of the system.
Cost
The Amazon Rekognition Image Moderation API employs a pay-as-you-go model based on the number of requests. The cost varies depending on the AWS Region used and follows a tiered pricing structure. As the volume of requests increases, the cost per request decreases. For more information, refer to Amazon Rekognition pricing.
In this solution, we utilized an Amazon Comprehend custom classifier and deployed it as an Amazon Comprehend endpoint to facilitate real-time inference. This implementation incurs both a one-time training cost and ongoing inference costs. For detailed information, refer to Amazon Comprehend Pricing.
Jumpstart enables you to quickly launch and deploy the Stable Diffusion model as a single package. Running inference on the Stable Diffusion model will incur costs for the underlying Amazon Elastic Compute Cloud (Amazon EC2) instance as well as inbound and outbound data transfer. For detailed information, refer to Amazon SageMaker Pricing.
Summary
In this post, we provided an overview of a sample solution that showcases how to moderate Stable Diffusion input prompts and output images using Amazon Comprehend and Amazon Rekognition. Additionally, you can define negative prompts in Stable Diffusion to prevent generating unsafe content. By implementing multiple moderation layers, the risk of producing unsafe content can be greatly reduced, ensuring a safer and more dependable user experience.
Learn more about content moderation on AWS and our content moderation ML use cases, and take the first step towards streamlining your content moderation operations with AWS.

About the Authors
Lana Zhang is a Senior Solutions Architect at AWS WWSO AI Services team, specializing in AI and ML for content moderation, computer vision, and natural language processing. With her expertise, she is dedicated to promoting AWS AI/ML solutions and assisting customers in transforming their business solutions across diverse industries, including social media, gaming, e-commerce, and advertising & marketing.
James Wu is a Senior AI/ML Specialist Solution Architect at AWS. helping customers design and build AI/ML solutions. James’s work covers a wide range of ML use cases, with a primary interest in computer vision, deep learning, and scaling ML across the enterprise. Prior to joining AWS, James was an architect, developer, and technology leader for over 10 years, including 6 years in engineering and 4 years in marketing and advertising industries.
Kevin Carlson is a Principal AI/ML Specialist with a focus on Computer Vision at AWS, where he leads Business Development and GTM for Amazon Rekognition. Prior to joining AWS, he led Digital Transformation globally at Fortune 500 Engineering company AECOM, with a focus on artificial intelligence and machine learning for generative design and infrastructure assessment. He is based in Chicago, where outside of work he enjoys time with his family, and is passionate about flying airplanes and coaching youth baseball.
John Rouse is a Senior AI/ML Specialist at AWS, where he leads global business development for AI services focused on Content Moderation and Compliance use cases. Prior to joining AWS, he has held senior level business development and leadership roles with cutting edge technology companies. John is working to put machine learning in the hands of every developer with AWS AI/ML stack. Small ideas bring about small impact. John’s goal for customers is to empower them with big ideas and opportunities that open doors so they can make a major impact with their customer.

Type of Activation Functions in Neural Networks

Activation functions for neural networks are an essential part of deep learning since they decide the accuracy and efficiency of the training model used to create or split a large-scale neural network and the output of deep learning models. The Activation Function is a valuable tool for neural networks since it allows them to focus on relevant data while discarding the rest. As with any other function, the Activation Function (the Transfer Function) takes an input and returns an output proportional to that input. The activation function of a node in a neural network specifies the node’s output in response to a particular input or group of inputs.

They effectively choose which neurons to activate or deactivate to achieve the intended result. The input is also nonlinearly transformed to improve performance on a sophisticated neural network. Any information in the 1 to -1 can have its output normalized with the activation function. Since neural networks are often trained on millions of data points, it is essential that the activation function be fast and that it minimizes the amount of time needed to calculate results.

 Let’s check out the structure of Neural Networks now and look at how Neural Networks Architecture is put together and what elements are present in Neural Networks.

An artificial neural network contains a large number of linked individual neurons. The activation function, bias, and weight of each are specified.

Input layer – The domain’s raw data is sent into the input layer. This layer is the lowest level where any calculation takes place. The only thing these nodes do is relay data to the next secret layer.

Hidden layer – Upon receiving features from the input layer, the hidden layer performs various computations before passing the result on to the output layer. Layer 2 nodes are hidden from view, providing a layer of abstraction for the underlying neural network.

Output layer – The output of the network’s hidden layer is brought together at this layer, which provides the network’s ultimate value.

Importance of Activation Functions

Since a linear equation is a polynomial of just one degree, a neural network without an activation function is merely a linear regression model. It is easy to solve but restricted in its capacity to tackle complicated problems or higher-degree polynomials.

An activation function is used in a neural network to provide non-linearity. Although the activation function’s computation adds an extra step at each layer during forward propagation, it is well worth the effort.

In the absence, every neuron will be doing a linear transformation on the inputs using the weights and biases. The composite of two linear functions is a linear function itself; hence the total number of hidden layers in the neural network does not affect its behavior.

Types of Activation Function

 Neural Network is classified mainly into three parts under which different Activation Functions are used.

Binary step function

Linear function

Non-linear activation function

Binary Step Neural Network Activation Function

Binary Step Function

This activation function is quite simplistic, serving primarily as a threshold-based classifier in which we set a threshold value to determine whether a particular neuron’s output is activated. If the value of the input to the activation function is more significant than a certain threshold, the neuron is activated, and its output is passed on to the next hidden layer; otherwise, the neuron is deactivated.

Limitations:

It is unsuitable for issues requiring multiple values, such as multi-class classification, because it only provides single-valued results.

Since the step function has no gradient, backpropagation encounters difficulty.

Linear Neural Network Action Function

Linear Function

An activation function where the output is equal to the input is called a linear activation function. This function is also called “no activation” or the “identity function” (x1.0). The function takes the weighted sum of the input and spits out the value without changing it. In other words, our function is proportional to the total of neurons or input. Therefore we have a straight-line activation function. Generating a broad range of activations is more efficient using linear activation functions. A line with a positive slope may increase the firing rate in response to an increase in the input rate.

Limitations:

Backpropagation cannot be used since the function’s derivative is a constant with no bearing on the input x.

The neural network’s last layer is always a linear function of the first layer. A linear activation function eliminates all of its layers to reduce the neural network to its simplest form. When a linear activation function is applied to a neural network, all layers will effectively merge into a single super layer.

Non-Linear Neural Network Activation Function

Sigmoid Activation Function

This function accepts real numbers as input and returns integers between 0 and 1. The output value will be closer to 1.0 the bigger (more positive) the input is and will be closer to 0.0 the smaller (more negative) the input is. As a result, it finds its most common application in models whose output requires probability prediction. A sigmoid distribution is appropriate since all probabilities lie between 0 and 1. It’s also called a Logistics Function.

 Limitations:

Logistic functions do not produce symmetrical results near zero. This ensures that all neuron outputs share the same sign. This complicates the inherently unstable training of the neural network.

2.  ReLU (Rectified Linear unit) Activation Function

Nowadays, the ReLU is the most popular activation function. Since this is a crucial component of any deep learning or convolutional neural network system. While the function’s 0–infinity range presents some challenges, the fact that negative values are converted to zero at such a high rate means that it neither maps nor fits into data correctly. The critical hitch is that the ReLU function does not activate all neurons simultaneously. The neurons are turned off when the linear transformation yields a value less than 0. Since ReLU is linear and non-saturating, it speeds up the gradient descent’s approach to the global minimum of the loss function.

Limitations:

Because of the potential for the weights to go negative at a high Learning Rate, the output term could also be harmful. Reducing the learning rate is one possible solution for the same.

The model’s capacity to appropriately fit or learn from the data is impaired since all negative input values are instantly set to zero.

3.  Tanh Function

Tanh function is also called as Hyperbolic function. The tanh is an improved version of the logistic Sigmoid. The tanh function has the range of (-1 to 1). Tanh is sigmoidal as well (s-shaped). The negative inputs are mapped strongly negatively, whereas the zero inputs are mapped near zero, which is an advantage when plotting a tanh graph. We can differentiate the function. While the function itself is monotonic, its derivative is not.

Limitations:

Similar to the sigmoid activation function, it suffers from the issue of vanishing gradients. And the tanh function’s gradient is much steeper than the Sigmoid’s.

4.  Leaky ReLU Function

Because of its slight positive slope in the negative area, Leaky ReLU is an enhanced variant of the ReLU function that can be used to circumvent the Dying ReLU problem. Consequently, the nodes are not turned off, and the ReLU problem of dying nodes is avoided since negative values are not converted to 0.

Limitations:

Learning model parameters can be tedious when the gradient is minimal for negative values.

5.  Parametric ReLU Function

The P-ReLU or Parametric Since negative values do not reach 0, the nodes are not turned off, and the dying ReLU problem does not arise, ReLU is a variant of the Leaky ReLU variate that seeks to replace the negative half of ReLU with a line of a slope.

Limitations:

Depending on the value of the slope parameter, it may yield varying results for various issues.

6.  Exponential Linear Units Function

The ELU activation function is another option, and it is well-known for its rapid convergence and high-quality output. A modified exponential function is substituted for the negative terminal. Unfortunately, there is a growing computational overhead, but at least the ReLU problem is no longer terminal. It reduces the likelihood of the “dead” ReLU issue by providing a “log” curve for negative input values. It aids the network in adjusting its biases and weights appropriately.

Limitations:

The inclusion of an exponential operation causes a rise in processing time.

The value of ‘a’ is not acquired in any way, and the Gradient explosion issue is one of the main limitations.

7.  Scaled Exponential Linear Units Function

Internal normalization is handled by SELU, which was developed for self-normalizing networks and ensures that the mean and variance of each layer are maintained. By modifying the mean and variance, SELU makes this normalization possible. Because the ReLU activation function cannot produce negative values, SELU may move the mean in previously impossible ways. The variance may be modified with the use of gradients.

To be amplified, the SELU activation function requires an area with a gradient greater than one. Network convergence occurs more quickly when internal normalization is used more than external normalizing.

8.  Gaussian Error Linear Unit Function

Many of the most popular NLP models, including BERT, ROBERTa, and ALBERT, are compatible with the GELU activation function. Dropout, zoneout, and ReLUs qualities are combined to inspire this activation function. Across all tasks in computer vision, NLP, and speech recognition, GELU non-linearity improves performance more than ReLU and ELU activations.

9.  Softmax Activation Function

In the same way that sigmoid activation assigns a value to each input variable based on its weight, softmax assigns a value to each input variable based on the sum of these weights, which is ultimately one. This is why softmax is typically used at the output layer, the final layer used for decision-making.

Conclusion

To better comprehend and carry out increasingly complicated tasks, the input is often subjected to a non-linear transformation, and activation functions like these play a crucial role in this process. A neural network’s hidden layers will typically have the same activation function. As the network’s parameters may be learned by backpropagation, this activation function has to be differentiable. We have covered the most common activation functions, their limitations (if any), and how they are employed.

Despite the widespread familiarity with the “Activation Function,” few like to contemplate its effects. Why they’re utilized, how they contribute, what has to be said, etc. Although the issues may appear straightforward, the underlying dynamics may be rather complicated.

References:

https://www.analyticssteps.com/blogs/7-types-activation-functions-neural-network

https://towardsdatascience.com/activation-functions-neural-networks-1cbd9f8d91d6

https://thehackweekly.com/8-most-popular-types-of-activation-functions-in-neural-networks/

https://www.v7labs.com/blog/neural-networks-activation-functions

The post <strong>Type of Activation Functions in Neural Networks</strong> appeared first on MarkTechPost.

What Is Synthetic Data? Their Types, Use Cases, And Applications For M …

The field of Data Science and Machine Learning is growing every single day. As new models and algorithms are being proposed with time, these new algorithms and models need enormous data for training and testing. Deep Learning models are gaining so much popularity nowadays, and those models are also data-hungry. Obtaining such a massive amount of data in the context of the different problem statements is quite a hideous, time-consuming, and expensive process. The data is gathered from real-life scenarios, which raises security liabilities and privacy concerns. Most of the data is private and protected by privacy laws and regulations, which hinders the sharing and movement of data between organizations or sometimes between different departments of a single organization—resulting in delaying experiments and testing of products. So the question arises how can this issue be solved? How can the data be made more accessible and open without raising concerns about someone’s privacy?  

The solution to this problem is something known as Synthetic data. 

So, What is Synthetic Data?

By definition, synthetic data is generated artificially or algorithmically and closely resembles actual data’s underlying structure and property. If the synthesized data is good, it is indistinguishable from real data.

How Many Different Types of Synthetic Data can there be?

The answer to this question is very open-ended, as data can take many forms, but majorly we have 

Text data

Audio or Visual data (for example, Images, videos, and audio)

Tabular data

Use cases of synthetic data for machine learning

We will only discuss the use cases of only three types of synthetic data, as mentioned above.

Use of synthetic text data for training NLP models

Synthetic data has applications in the field of natural language processing. For instance, the Alexa AI team at Amazon uses synthetic data to finish the training set for their NLU system (natural language understanding). It provides them with a solid basis for training new languages without existing or enough consumer interaction data.

Using synthetic data for training vision algorithms

   Let’s discuss a widespread use case here. Suppose we want to develop an algorithm to detect or count the number of faces in an image. We can use a GAN or some other generative network to generate realistic human faces, i.e., faces that do not exist in the real world, to train the model. Another advantage is that we can generate as much data as we want from these algorithms without breaching anyone’s privacy. But we cannot use real data as it contains some individuals’ faces, so some privacy policies restrict using that data.

Another use case is doing reinforcement learning in a simulated environment. Suppose we want to test a robotic arm designed to grab an object and place it in a box. A reinforcement learning algorithm is designed for this purpose. We need to do experiments to test it because this is how the reinforcement learning algorithm learns. Setting up an experiment in a real-life scenario is quite expensive and time-consuming, limiting the number of different experiments we can perform. But if we do the experiments in the simulated environment, then setting up the experiment is relatively inexpensive as it will not require a robotic arm prototype.

Uses of Tabular data

Tabular synthetic data is artificially generated data that mimics real-world data stored in tables. This data is structured in rows and columns. These tables can contain any data, like a music playlist. For each song, your music player maintains a bunch of information: its name, the singer, its length, its genre, and so on. It can also be a finance record like bank transactions, stock prices, etc.

Synthetic tabular data related to bank transactions are used to train models and design algorithms to detect fraudulent transactions. Stock price data from the past can be used to train and test models for predicting future prices of stocks.

One of the significant advantages of using synthetic data in machine learning is that the developer has control over the data; he can make changes to the data as per the need to test any idea and experiment with that. Meanwhile, a developer can test the model on synthesized data, and it will give a very clear idea of how the model will perform on real-life data. If a developer wants to try a model and waits for real data, then acquiring data can take weeks or even months. Hence, delaying the development and innovation of technology.

Now we are ready to discuss how synthetic data help to resolve the issues related to data privacy.

Many industries depend on the data generated by their customers for innovation and development, but that data contains Personally Identifiable Information (PII), and privacy laws strictly regulate the processing of such data. For instance, the General Data Protection Regulation (GDPR) forbids uses that weren’t explicitly consented to when the organization collected the data.‍ As synthetic data very closely resemble the underlying structure of real data and, at the same time, ensures that no individual present in the real data can be re-identified from the synthetic data. As a result, the processing and sharing of synthetic data have much fewer regulations, resulting in faster developments and innovations and easy access to data.

Conclusion

Synthetic data has many significant advantages. It gives ML developers control over experiments and increases development speed as the data is now more accessible. It promotes collaboration on a bigger scale since data is freely shareable. Additionally, synthetic data guarantees to protect the privacy of the individuals from the real data.

Top Synthetic Data Tools/Startups For Machine Learning Models in 2022

The post What Is Synthetic Data? Their Types, Use Cases, And Applications For Machine Learning And Privacy appeared first on MarkTechPost.

What is Machine Learning as a Service? Benefits And Top MLaaS Platform …

Machine learning uses statistical analysis to generate prediction output without requiring explicit programming. It employs a chain of algorithms that learn to interpret the relationship between datasets to achieve its goal. Unfortunately, most data scientists are not software engineers, which can make it difficult to scale up to meet the needs of a growing firm. Data scientists can easily handle these complications thanks to Machine Learning as a Service (MLaaS).

 What is MLaas?

Machine Learning as a service (MLaaS) has recently gained much traction due to its benefits to data science, machine learning engineering, data engineering, and other machine learning professionals. The term “machine learning as a service” refers to a wide range of cloud-based platforms that employ machine learning techniques to offer answers.

 The term “machine learning as a service” (MLaaS) refers to a suite of cloud-based offerings that make machine learning resources available to users. Customers may reap the benefits of machine learning with MLaaS without incurring the overhead of building an in-house machine learning team or taking on the associated risks. A wide variety of services, including predictive analytics, deep learning, application programming interfaces, data visualization, and natural language processing, are available from various suppliers. The service provider’s data centers take care of all the computing.

 Although the concept of machine learning has been around for decades, it has only lately entered the mainstream, and MLaaS represents the next generation of this technology. MLaaS aims to reduce the complexity and cost of implementing machine learning within an organization, allowing quicker and more accurate data analysis. Some MLaaS systems are designed for specialized tasks like picture recognition or text-to-speech synthesis, while others are built with broader, cross-industry uses in mind, such as in sales and marketing.

How do MLaaS works?

MLaaS is a collection of services that provides pre-built, rather general machine learning tools that each company may tailor to its needs. Data visualization, APIs galore, facial recognition, NLP, PA, DL, and more are all on the menu here. Data pattern discovery is the primary application of MLaaS algorithms. These regularities are then employed as the basis for mathematical models, which are then used to create predictions based on new information.

In addition to being the first full-stack AI platform, MLaaS unifies a wide variety of systems, including but not limited to mobile apps, business data, industrial automation and control, and cutting-edge sensors like LiDar. In addition to pattern recognition, MLaaS also facilitates probabilistic inference. This offers a comprehensive and reliable ML solution, with the added benefit of allowing the organization to choose from various approaches when designing a workflow tailored to its unique requirements.

What are the benefits of MLaas?

The main perk of using MLaaS is not worrying about putting together your infrastructure from the ground up. Many firms, especially smaller and medium-sized enterprises (SMEs), lack the resources and capacity to store and handle large amounts of data. The expense is compounded by the need to purchase or build massive storage space to house all this information. Here, the MLaaS infrastructure takes over data storage and administration.

 Because MLaaS platforms are cloud providers, they offer cloud storage; they give means to manage data for machine learning experiments correctly, data pipelining, and so on, making it easier for data engineers to access and analyze the data.

 Businesses can use MLaaS providers’ predictive analytics and data visualization solutions. In addition, they provide application programming interfaces (APIs) for a wide variety of other uses, such as emotion analysis, facial recognition, credit risk evaluation, corporate intelligence, healthcare, etc.

 With MLaaS, data scientists may begin using machine learning immediately instead of waiting around for lengthy software installations or sourcing their servers, as is the case with most other cloud computing services. With MLaaS, the actual computing takes place in the provider’s data centers, making it extremely handy for enterprises.

Top MLaaS Platforms

1.      AWS Machine Learning

When it comes to cloud services, AWS Machine Learning can do it all. It paves the way for businesses to use almost limitless resources, including computational power and data storage. There are even more advanced technologies available, like MLaaS.

Machine learning solutions provided by AWS Machine learning are – Amazon Polly, Amazon Lex, Amazon Sagemaker, Amazon Rekognition, Amazon Comprehend, and Amazon Transcribe.

2.      Google Cloud Machine Learning

Developers and data scientists may use the Google Cloud Machine Learning (GCP) AI platform to create, launch, and manage machine learning models. The Tensor Processing Unit, a chip developed by Google specifically for machine learning, is a key differentiator of this service.

Machine learning solutions provided by GCP are – Build with AI, Conversational AI, and Dialogflow CX

3.      Microsoft Azure ML Studio

Microsoft Azure ML Studio is the online interface developers, and data scientists can use when developing, training rapidly, and deploying machine learning models. Despite starting in the offline world, Microsoft has made great strides to catch up to the leading web players.

Sci-kit learns TensorFlow, Keras, MxNet, and PyTorch are popular frameworks that can be used with Azure Machine Learning Studio.

4.      IBM Watson Machine Learning

One can create, train, and release Machine Learning models with IBM Watson Machine Learning. Popular frameworks like TensorFlow, Caffe, PyTorch, and Keras provide graphical tooling that makes model construction a breeze.

5.      BigML

BigML is an all-encompassing machine-learning platform with many methods for managing and creating machine-learning models. The tool helps with predictive applications in many fields, including aviation, automobiles, energy, entertainment, finance, food and agriculture, healthcare, and the Internet of Things. BigML offers its services via a web interface, a command line interface, and an application programming interface.

Global Market and Impact so far

ReportLinker, a market research provider, predicts that the machine learning as a service market will grow to $36.2 billion globally by 2028, expanding at an annual growth rate (CAGR) of 31.6% between 2018 and 2028.

Major growth factors for the machine learning as a service business include rising interest in cloud computing and developments in AI and cognitive computing. The need for effective data management is increasing as more companies move their data from on-premises to cloud storage. Since MLaaS platforms are essentially cloud providers, they make it easier for data engineers to access and process data for machine learning experiments and data pipelines.

The global economic and financial institutions are in shambles after Covid-19 killed millions of people. With the rise of this COVID-19 pandemic, it is conceivable that artificial intelligence technologies will help in the battle against it. Using population monitoring strategies made possible by machine learning and artificial intelligence, COVID-19 instances are being monitored and traced in numerous nations.

Below are the drivers driving the MLaaS industry:

Machine learning as a driving force in artificial intelligence

The rise of Big Data and the need for cloud computing

To Sum It Up:

Many different tools exist to aid in the creation of ML. Machine learning development environments may be found with specialized tools that take care of automation, allow for many versions, and provide a comprehensive ML research and development setting. Since it can be grown to infinity and then back down to the size of a current PC with only a few clicks, MLaaS is a suitable solution for the complexity and dynamic of the modern world.

If you’re a data scientist or engineer, you know how hectic your days can get. MLaaS provides a wealth of resources to help you get more done in less time. The key benefit is that you won’t spend money on brand-new infrastructure, computers, setup, or upkeep.

Don’t forget to join our Reddit page and discord channel, where we share the latest AI research news, cool AI projects, and more.
The post What is Machine Learning as a Service? Benefits And Top MLaaS Platforms appeared first on MarkTechPost.

Use proprietary foundation models from Amazon SageMaker JumpStart in A …

Amazon SageMaker JumpStart is a machine learning (ML) hub that can help you accelerate your ML journey. With SageMaker JumpStart, you can discover and deploy publicly available and proprietary foundation models to dedicated Amazon SageMaker instances for your generative AI applications. SageMaker JumpStart allows you to deploy foundation models from a network isolated environment, and doesn’t share customer training and inference data with model providers.
In this post, we walk through how to get started with proprietary models from model providers such as AI21, Cohere, and LightOn from Amazon SageMaker Studio. SageMaker Studio is a notebook environment where SageMaker enterprise data scientist customers evaluate and build models for their next generative AI applications.
Foundation models in SageMaker
Foundation models are large-scale ML models that contain billions of parameters and are pre-trained on terabytes of text and image data so you can perform a wide range of tasks, such as article summarization and text, image, or video generation. Because foundation models are pre-trained, they can help lower training and infrastructure costs and enable customization for your use case.
SageMaker JumpStart provides two types of foundation models:

Proprietary models – These models are from providers such as AI21 with Jurassic-2 models, Cohere with Cohere Command, and LightOn with Mini trained on proprietary algorithms and data. You can’t view model artifacts such as weight and scripts, but you can still deploy to SageMaker instances for inferencing.
Publicly available models – These are from popular model hubs such as Hugging Face with Stable Diffusion, Falcon, and FLAN trained on publicly available algorithms and data. For these models, users have access to model artifacts and are able to fine-tune with their own data prior to deployment for inferencing.

Discover models
You can access the foundation models through SageMaker JumpStart in the SageMaker Studio UI and the SageMaker Python SDK. In this section, we go over how to discover the models in the SageMaker Studio UI.
SageMaker Studio is a web-based integrated development environment (IDE) for ML that lets you build, train, debug, deploy, and monitor your ML models. For more details on how to get started and set up SageMaker Studio, refer to Amazon SageMaker Studio.
Once you’re on the SageMaker Studio UI, you can access SageMaker JumpStart, which contains pre-trained models, notebooks, and prebuilt solutions, under Prebuilt and automated solutions.

From the SageMaker JumpStart landing page, you can browse for solutions, models, notebooks, and other resources. The following screenshot shows an example of the landing page with solutions and foundation models listed.

Each model has a model card, as shown in the following screenshot, which contains the model name, if it is fine-tunable or not, the provider name, and a short description about the model. You can also open the model card to learn more about the model and start training or deploying.

Subscribe in AWS Marketplace
Proprietary models in SageMaker JumpStart are published by model providers such as AI21, Cohere, and LightOn. You can identify proprietary models by the “Proprietary” tag on model cards, as shown in the following screenshot.

You can choose View notebook on the model card to open the notebook in read-only mode, as shown in the following screenshot. You can read the notebook for important information regarding prerequisites and other usage instructions.

After importing the notebook, you need to select the appropriate notebook environment (image, kernel, instance type, and so on) before running codes. You should also follow the subscription and usage instructions per the selected notebook.
Before using a proprietary model, you need to first subscribe to the model from AWS Marketplace:

Open the model listing page in AWS Marketplace.

The URL is provided in the Important section of the notebook, or you can access it from the SageMaker JumpStart service page. The listing page shows the overview, pricing, usage, and support information about the model.

On the AWS Marketplace listing, choose Continue to subscribe.

If you don’t have the necessary permissions to view or subscribe to the model, reach out to your IT admin or procurement point of contact to subscribe to the model for you. Many enterprises may limit AWS Marketplace permissions to control the actions that someone with those permissions can take in the AWS Marketplace Management Portal.

On the Subscribe to this software page, review the details and choose Accept offer if you and your organization agree with the EULA, pricing, and support terms.

If you have any questions or a request for volume discount, reach out to the model provider directly via the support email provided on the detail page or reach out to your AWS account team.

Choose Continue to configuration and choose a Region.

You will see a product ARN displayed. This is the model package ARN that you need to specify while creating a deployable model using Boto3.

Copy the ARN corresponding to your Region and specify the same in the notebook’s cell instruction.

Sample inferencing with sample prompts
Let’s look at some of the sample foundation models from A21 Labs, Cohere, and LightOn that are discoverable from SageMaker JumpStart in SageMaker Studio. All of them have same the instructions to subscribe from AWS Marketplace and import and configure the notebook.
AI21 Summarize
The Summarize model by A121 Labs condenses lengthy texts into short, easy-to-read bites that remain factually consistent with the source. The model is trained to generate summaries that capture key ideas based on a body of text. It doesn’t require any prompting. You simply input the text that needs to be summarized. Your source text can contain up to 50,000 characters, translating to roughly 10,000 words, or an impressive 40 pages.

The sample notebook for AI21 Summarize model provides important prerequisites that needs to be followed. For example the model is subscribed from AWS Marketplace , have appropriate IAM roles permissions, and required boto3 version etc. It walks you through how to select the model package, create endpoints for real-time inference, and then clean up.

The selected model package contains the mapping of ARNs to Regions. This is the information you captured after choosing Continue to configuration on the AWS Marketplace subscription page (in the section Evaluate and subscribe in Marketplace) and then selecting a Region for which you will see the corresponding product ARN.
The notebook may already have ARN prepopulated.

You then import some libraries required to run this notebook and install wikipedia, which is a Python library that makes it easy to access and parse data from Wikipedia. The notebook uses this later to showcase how to summarize a long text from Wikipedia.

The notebook also proceeds to install the ai21 Python SDK, which is a wrapper around SageMaker APIs such as deploy and invoke endpoint.

The next few cells of the notebook walk through the following steps:

Select the Region and fetch the model package ARN from model package map
Create your inference endpoint by selecting an instance type (depending on your use case and supported instance for the model; see Task-specific models for more details) to run the model on
Create a deployable model from the model package

Let’s run the inference to generate a summary of a single paragraph taken from a news article. As you can see in the output, the summarized text is presented as an output by the model.

AI21 Summarize can handle inputs up to 50,000 characters. This translates into roughly 10,000 words, or 40 pages. As a demonstration of the model’s behavior, we load a page from Wikipedia.

Now that you have performed a real-time inference for testing, you may not need the endpoint anymore. You can delete the endpoint to avoid being charged.

Cohere Command
Cohere Command is a generative model that responds well with instruction-like prompts. This model provides businesses and enterprises with best quality, performance, and accuracy in all generative tasks. You can use Cohere’s Command model to invigorate your copywriting, named entity recognition, paraphrasing, or summarization efforts and take them to the next level.

The sample notebook for Cohere Command model provides important prerequisites that needs to be followed. For example the model is subscribed from AWS Marketplace, have appropriate IAM roles permissions, and required boto3 version etc. It walks you through how to select the model package, create endpoints for real-time inference, and then clean up.
Some of the tasks are similar to those covered in the previous notebook example, like installing Boto3, installing cohere-sagemaker (the package provides functionality developed to simplify interfacing with the Cohere model), and getting the session and Region.
Let’s explore creating the endpoint. You provide the model package ARN, endpoint name, instance type to be used, and number of instances. Once created, the endpoint appears in your endpoint section of SageMaker.

Now let’s run the inference to see some of the outputs from the Command model.
The following screenshot shows a sample example of generating a job post and its output. As you can see, the model generated a post from the given prompt.

Now let’s look at the following examples:

Generate a product description
Generate a body paragraph of a blog post
Generate an outreach email

As you can see, the Cohere Command model generated text for various generative tasks.

Now that you have performed real-time inference for testing, you may not need the endpoint anymore. You can delete the endpoint to avoid being charged.

LightOn Mini-instruct
Mini-instruct, an AI model with 40 billion billion parameters created by LightOn, is a powerful multilingual AI system that has been trained using high-quality data from numerous sources. It is built to understand natural language and react to commands that are specific to your needs. It performs admirably in consumer products like voice assistants, chatbots, and smart appliances. It also has a wide range of business applications, including agent assistance and natural language production for automated customer care.

The sample notebook for LightOn Mini-instruct model provides important prerequisites that needs to be followed. For example the model is subscribed from AWS Marketplace, have appropriate IAM roles permissions, and required boto3 version etc. It walks you through how to select the model package, create endpoints for real-time inference, and then clean up.
Some of the tasks are similar to those covered in the previous notebook example, like installing Boto3 and getting the session Region.
Let’s look at creating the endpoint. First, provide the model package ARN, endpoint name, instance type to be used, and number of instances. Once created, the endpoint appears in your endpoint section of SageMaker.

Now let’s try inferencing the model by asking it to generate a list of ideas for articles for a topic, in this case watercolor.

As you can see, the LightOn Mini-instruct model was able to provide generated text based on the given prompt.
Clean up
After you have tested the models and created endpoints above for the example proprietary Foundation Models, make sure you delete the SageMaker inference endpoints and delete the models to avoid incurring charges.
Conclusion
In this post, we showed you how to get started with proprietary models from model providers such as AI21, Cohere, and LightOn in SageMaker Studio. Customers can discover and use proprietary Foundation Models in SageMaker JumpStart from Studio, the SageMaker SDK, and the SageMaker Console. With this, they have access to large-scale ML models that contain billions of parameters and are pretrained on terabytes of text and image data so customers can perform a wide range of tasks such as article summarization and text, image, or video generation. Because foundation models are pretrained, they can also help lower training and infrastructure costs and enable customization for your use case.
Resources

SageMaker JumpStart documentation
SageMaker JumpStart Foundation Models documentation
SageMaker JumpStart product detail page
SageMaker JumpStart model catalog

About the authors
June Won is a product manager with SageMaker JumpStart. He focuses on making foundation models easily discoverable and usable to help customers build generative AI applications.
Mani Khanuja is an Artificial Intelligence and Machine Learning Specialist SA at Amazon Web Services (AWS). She helps customers using machine learning to solve their business challenges using the AWS. She spends most of her time diving deep and teaching customers on AI/ML projects related to computer vision, natural language processing, forecasting, ML at the edge, and more. She is passionate about ML at edge, therefore, she has created her own lab with self-driving kit and prototype manufacturing production line, where she spends lot of her free time.
Nitin Eusebius is a Sr. Enterprise Solutions Architect at AWS with experience in Software Engineering , Enterprise Architecture and AI/ML. He works with customers on helping them build well-architected applications on the AWS platform. He is passionate about solving technology challenges and helping customers with their cloud journey.

How Earth.com and Provectus implemented their MLOps Infrastructure wit …

This blog post is co-written with Marat Adayev and Dmitrii Evstiukhin from Provectus.
When machine learning (ML) models are deployed into production and employed to drive business decisions, the challenge often lies in the operation and management of multiple models. Machine Learning Operations (MLOps) provides the technical solution to this issue, assisting organizations in managing, monitoring, deploying, and governing their models on a centralized platform.
At-scale, real-time image recognition is a complex technical problem that also requires the implementation of MLOps. By enabling effective management of the ML lifecycle, MLOps can help account for various alterations in data, models, and concepts that the development of real-time image recognition applications is associated with.
One such application is EarthSnap, an AI-powered image recognition application that enables users to identify all types of plants and animals, using the camera on their smartphone. EarthSnap was developed by Earth.com, a leading online platform for enthusiasts who are passionate about the environment, nature, and science.
Earth.com’s leadership team recognized the vast potential of EarthSnap and set out to create an application that utilizes the latest deep learning (DL) architectures for computer vision (CV). However, they faced challenges in managing and scaling their ML system, which consisted of various siloed ML and infrastructure components that had to be maintained manually. They needed a cloud platform and a strategic partner with proven expertise in delivering production-ready AI/ML solutions, to quickly bring EarthSnap to the market. That is where Provectus, an AWS Premier Consulting Partner with competencies in Machine Learning, Data & Analytics, and DevOps, stepped in.
This post explains how Provectus and Earth.com were able to enhance the AI-powered image recognition capabilities of EarthSnap, reduce engineering heavy lifting, and minimize administrative costs by implementing end-to-end ML pipelines, delivered as part of a managed MLOps platform and managed AI services.
Challenges faced in the initial approach
The executive team at Earth.com was eager to accelerate the launch of EarthSnap. They swiftly began to work on AI/ML capabilities by building image recognition models using Amazon SageMaker. The following diagram shows the initial image recognition ML workflow, run manually and sequentially.

The models developed by Earth.com lived across various notebooks. They required the manual sequential execution run of a series of complex notebooks to process the data and retrain the model. Endpoints had to be deployed manually as well.
Earth.com didn’t have an in-house ML engineering team, which made it hard to add new datasets featuring new species, release and improve new models, and scale their disjointed ML system.
The ML components for data ingestion, preprocessing, and model training were available as disjointed Python scripts and notebooks, which required a lot of manual heavy lifting on the part of engineers.
The initial solution also required the support of a technical third party, to release new models swiftly and efficiently.
First iteration of the solution
Provectus served as a valuable collaborator for Earth.com, playing a crucial role in augmenting the AI-driven image recognition features of EarthSnap. The application’s workflows were automated by implementing end-to-end ML pipelines, which were delivered as part of Provectus’s managed MLOps platform and supported through managed AI services.
A series of project discovery sessions were initiated by Provectus to examine EarthSnap’s existing codebase and inventory the notebook scripts, with the goal of reproducing the existing model results. After the model results had been restored, the scattered components of the ML workflow were merged into an automated ML pipeline using Amazon SageMaker Pipelines, a purpose-built CI/CD service for ML.
The final pipeline includes the following components:

Data QA & versioning – This step run as a SageMaker Processing job, ingests the source data from Amazon Simple Storage Service (Amazon S3) and prepares the metadata for the next step, containing only valid images (URI and label) that are filtered according to internal rules. It also persists a manifest file to Amazon S3, including all necessary information to recreate that dataset version.
Data preprocessing – This includes multiple steps wrapped as SageMaker processing jobs, and run sequentially. The steps preprocess the images, convert them to RecordIO format, split the images into datasets (full, train, test and validation), and prepare the images to be consumed by SageMaker training jobs.
Hyperparameter tuning – A SageMaker hyperparameter tuning job takes as input a subset of the training and validation set and runs a series of small training jobs under the hood to determine the best parameters for the full training job.
Full training – A step SageMaker training job launches the training job on the entire data, given the best parameters from the hyperparameter tuning step.
Model evaluation – A step SageMaker processing job is run after the final model has been trained. This step produces an expanded report containing the model’s metrics.
Model creation – The SageMaker ModelCreate step wraps the model into the SageMaker model package and pushes it to the SageMaker model registry.

All steps are run in an automated manner after the pipeline has been run. The pipeline can be run via any of following methods:

Automatically using AWS CodeBuild, after the new changes are pushed to a primary branch and a new version of the pipeline is upserted (CI)
Automatically using Amazon API Gateway, which can be triggered with a certain API call
Manually in Amazon SageMaker Studio

After the pipeline run (launched using one of preceding methods), a trained model is produced that is ready to be deployed as a SageMaker endpoint. This means that the model must first be approved by the PM or engineer in the model registry, then the model is automatically rolled out to the stage environment using Amazon EventBridge and tested internally. After the model is confirmed to be working as expected, it’s deployed to the production environment (CD).
The Provectus solution for EarthSnap can be summarized in the following steps:

Start with fully automated, end-to-end ML pipelines to make it easier for Earth.com to release new models
Build on top of the pipelines to deliver a robust ML infrastructure for the MLOps platform, featuring all components for streamlining AI/ML
Support the solution by providing managed AI services (including ML infrastructure provisioning, maintenance, and cost monitoring and optimization)
Bring EarthSnap to its desired state (mobile application and backend) through a series of engagements, including AI/ML work, data and database operations, and DevOps

After the foundational infrastructure and processes were established, the model was trained and retrained on a larger dataset. At this point, however, the team encountered an additional issue when attempting to expand the model with even larger datasets. We needed to find a way to restructure the solution architecture, making it more sophisticated and capable of scaling effectively. The following diagram shows the EarthSnap AI/ML architecture.

The AI/ML architecture for EarthSnap is designed around a series of AWS services:

Sagemaker Pipeline runs using one of the methods mentioned above (CodeBuild, API, manual) that trains the model and produces artifacts and metrics. As a result, the new version of the model is pushed to the Sagemaker Model registry
Then the model is reviewed by an internal team (PM/engineer) in model registry and approved/rejected based on metrics provided
Once the model is approved, the model version is automatically deployed to the stage environment using the Amazon EventBridge that tracks the model status change
The model is deployed to the production environment if the model passes all tests in the stage environment

Final solution
To accommodate all necessary sets of labels, the solution for EarthSnap’s model required substantial modifications, because incorporating all species within a single model proved to be both costly and inefficient. The plant category was selected first for implementation.
A thorough examination of plant data was conducted, to organize it into subsets based on shared internal characteristics. The solution for the plant model was redesigned by implementing a multi-model parent/child architecture. This was achieved by training child models on grouped subsets of plant data and training the parent model on a set of data samples from each subcategory. The Child models were employed for accurate classification within the internally grouped species, while the parent model was utilized to categorize input plant images into subgroups. This design necessitated distinct training processes for each model, leading to the creation of separate ML pipelines. With this new design, along with the previously established ML/MLOps foundation, the EarthSnap application was able to encompass all essential plant species, resulting in improved efficiency concerning model maintenance and retraining. The following diagram illustrates the logical scheme of parent/child model relations.

Upon completing the redesign, the ultimate challenge was to guarantee that the AI solution powering EarthSnap could manage the substantial load generated by a broad user base. Fortunately, the managed AI onboarding process encompasses all essential automation, monitoring, and procedures for transitioning the solution into a production-ready state, eliminating the need for any further capital investment.
Results
Despite the pressing requirement to develop and implement the AI-driven image recognition features of EarthSnap within a few months, Provectus managed to meet all project requirements within the designated time frame. In just 3 months, Provectus modernized and productionized the ML solution for EarthSnap, ensuring that their mobile application was ready for public release.
The modernized infrastructure for ML and MLOps allowed Earth.com to reduce engineering heavy lifting and minimize the administrative costs associated with maintenance and support of EarthSnap. By streamlining processes and implementing best practices for CI/CD and DevOps, Provectus ensured that EarthSnap could achieve better performance while improving its adaptability, resilience, and security. With a focus on innovation and efficiency, we enabled EarthSnap to function flawlessly, while providing a seamless and user-friendly experience for all users.
As part of its managed AI services, Provectus was able to reduce the infrastructure management overhead, establish well-defined SLAs and processes, ensure 24/7 coverage and support, and increase overall infrastructure stability, including production workloads and critical releases. We initiated a series of enhancements to deliver managed MLOps platform and augment ML engineering. Specifically, it now takes Earth.com minutes, instead of several days, to release new ML models for their AI-powered image recognition application.
With assistance from Provectus, Earth.com was able to release its EarthSnap application at the Apple Store and Playstore ahead of schedule. The early release signified the importance of Provectus’ comprehensive work for the client.

”I’m incredibly excited to work with Provectus. Words can’t describe how great I feel about handing over control of the technical side of business to Provectus. It is a huge relief knowing that I don’t have to worry about anything other than developing the business side.”
– Eric Ralls, Founder and CEO of EarthSnap.

The next steps of our cooperation will include: adding advanced monitoring components to pipelines, enhancing model retraining, and introducing a human-in-the-loop step.
Conclusion
The Provectus team hopes that Earth.com will continue to modernize EarthSnap with us. We look forward to powering the company’s future expansion, further popularizing natural phenomena, and doing our part to protect our planet.
To learn more about the Provectus ML infrastructure and MLOps, visit Machine Learning Infrastructure and watch the webinar for more practical advice. You can also learn more about Provectus managed AI services at the Managed AI Services.
If you’re interested in building a robust infrastructure for ML and MLOps in your organization, apply for the ML Acceleration Program to get started.
Provectus helps companies in healthcare and life sciences, retail and CPG, media and entertainment, and manufacturing, achieve their objectives through AI.
Provectus is an AWS Machine Learning Competency Partner and AI-first transformation consultancy and solutions provider helping design, architect, migrate, or build cloud-native applications on AWS.
Contact Provectus | Partner Overview

About the Authors
Marat Adayev is an ML Solutions Architect at Provectus Dmitrii Evstiukhin is the Director of Managed Services at Provectus James Burdon is a Senior Startups Solutions Architect at AWS